Turn 5. An early turnover by the convoy, coupled with some terrific combat dice by Starkey’s galleys saw the Stella Artois board the Songkhla over her bows, and win the first round, while the Corona did the same with the Hainan Trader, and forced the merchantman’s immediate surrender. 
 The Bok Choy and Hainan Trader both had to do their compulsory sail moves after the turnover, so the fomer has sailed right past the Stella Artois without joining the fight, and the latter walked straight into the arms of the waiting Corona.
On Turn 6 the convoy suffered another early turnover, making it hard for them to accomplish anything. The wako junk Bok Choy used its “Yare” ability to spin around and contact the rear of the Stella Artois, but it had no AP left to grapple Starkey’s flagship.
Stella Artois captured the Songkhka, by using another good activation roll to fight multiple rounds of boarding. The Songkhla didn’t totally roll over though, dishing 1 damage to the Stella Artois.
The Corona has put a prize crew aboard the Hainan Trader (2 actions) and removed the boarding grapples, ready to back off next time. It should be able to just get out of the way of Bean Sprout, which also did a Yare spin to head towards the action. The Srivijaya galley, over on the L, has been stranded by both turnovers the convoy has suffered in its last two bounds.
I decided to call the game at this point, as C16 warfare at sea was not at all about losing experienced crews in escapable against-the-odds situations. The Srivijaya and Bok Choy will prudently flee the scene. Starkey will burn the Songkhka after transferring the crew to the Hainan Trader (to be sold, or used as rowers on the Orders own galleys). All his ships, including the prize, will return to Singapore to dispose of the booty and replenish stores before heading out again.
This was a fun game to play. I didn’t expect Starkey to have it so easy, thinking he’d most likely suffer damage in the attack and probably be forced to abort it. But having the flagship helped a lot (I haven’t really paid attention to this rule before) especially with the ‘dashing’ reputation, a real piece of luck. One unforeseen benefit was to save Starkey’s squadron from at least 1 early turnover (by giving a +1 mod to activation dice of friends within L). I’m sold.
*************
Encounter with the Sea Cannibals
Three months later ... we find Oliver Starkey and his squadron cruising the Moluccan Strait on the lookout for another opportunity to serve God and get rich. Approaching the small port of Ambon, they found a fleet of Sea Cannibal canoes closing in on the town and a Portuguese carrack anchored in the roads. Starkey makes a snap decision to get involved, on the basis that while the Portuguese are no friends, the Sea Cannibals are universally hated.
The old Portuguese carrack is known to every sailor in the Indies. It’s been making an annual Macao-Goa run, time out of mind. It usually stops at Ambon to squeeze in more spices before sailing on to Malacca.
Santa Isabella das Indias
Q4 C5: High castles, Merchantman, Reinforced hull, Sluggish, Square rigged (35)
The carrack will fight boarders but will not take any offensive action (key officers and crew are ashore and the guns have been dismounted to create more cargo space).
The Sea Cannibals are commanded by Te Heuheu Tukino (swaggering commander). He has -
Mangonui (double hulled canoe)
Q3 C3: Flagship, Imtimidating, Lateen rigged, Unarmed (52)
Ureia (double hulled canoe)
Q3 C3: Imtimidating, Lateen rigged, Unarmed (22)
Aoraki, Ngaurahoe, Ruapehu, Tongariro (war canoes)
Q2 C2: Boats, Imtimidating, Unarmed (4 x 28)
Starkey must prevent the Sa Isabella from falling into Cannibal hands (and not lose any of his own ships - well, maybe the junk) to win. Recapturing it from the Sea Cannibals counts, in fact it’s a better outcome because he can then claim it as his own prize. Starkey starts the game with Initiative.
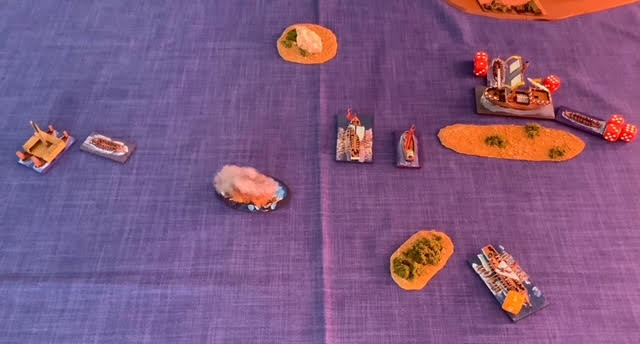
Three Turns in and close action seems imminent. At top Is the town of Ambon, with Sa Isabella moored offshore, boarding netting rigged and crew at action stations, but otherwise waiting on events. Tukino’s canoes are approaching from lower R, and Starkey’s squadron from the L.
The wind is coming from the SW (bottom L to top R) and Seems unlikely to change because, with a flagship in each squadron and the commanders being careful to maintain command distance as much as possible, the chances of double activation fails are much reduced.
It appears Tukino has decided to take out Starkey’s force before he focuses on the Sa Isabella, rather than, say, block or mask the galleys and snatch the carrack from under their noses. Which is what a real swashbuckling Sea Cannibal would do. I hope this doesn’t cause Tukino’s peers to doubt his soundness. But, the contingency Dice Gods must be obeyed.
By the end of Turn 6 red dice (damage) have sprouted everywhere. The galley Corona is being swarmed by the Sea Cannibals and seems about to be captured, though, unimpressed by the +1C Tukino’s “swaggering” reputation confers on his men, it has handed out as many red dice as it has suffered including 2 to the Mangonui, Tukino’s flagship. Corona also managed to cut the grapples to the Ruapehu, the smaller canoe trying to board it. One canoe (Aoraki) has bypassed the Corona inshore, and is turning around the island to menace the Sa Isabella.
Starkey’s flagship, the galley Stella Artois, has been shooting and pulling back as the other Cannibal canoes advance, while the junk Bean Sprout circles around behind, though it’s shooting has so far been off. The canoe (Tongariro) in front of Stella Artois has a rudder problem arising from a critical hit.
On Turn 6 the Sea Cannibals suffered an early turnover (the ships of both sides are now spread out beyond effective command distance) and the wind consequently shifted to Southerly (blowing across the table from bottom to top).
By the end of Turn 9 Starkey and the Knights are making a comeback. The galley Corona has been captured by the Sea Cannibals after an epic defence, but the Bean Sprout arrived just after the boarding action had finished and blasted the crippled Mangonui with a point-blank raking broadside, blowing it (and Te Heuheu Tukino) to smithereens. Bean Sprout then turned hard to port to try to recapture Corona from the prize crew.
Elsewhere the Sa Isabella is under boarding attack from Aoraki, with honours even so far. But the Ruapehu, albeit heavily damaged, is coming around the island to join the assault. Over of the L side of the action the Stella Artois has been making target practice of the unlucky Tongariro.
I ended the game after Turn 10 with the Sea Cannibals in an untenable position. The Corona has been recaptured and the erstwhile prize crew (the on,y survivors of the Mangonui) are now filling vacancies in the Corona’s ciurma. The Sa Isabella is continuing to mount a spirited defence against 2 canoes (Aoraki & Ruapehu, both now heavily damaged), and help from the Bean Sprout and Stella Artois is on the way. The canoe Tongariro has been sunk (centre of photo). The two Sea Cannibal vessels at L (Ureia & Ngaurahoe) will slip away while they can …
*************
A Ming Chinese anti-pirate patrol
Some time later, deep in the southern Arafura Sea, Starkey and his squadron are looking for the annual trepang fishing fleet to shake down. They are intercepted by a Chinese anti-pirate patrol, part of An-te Hai’s enforcement operation. It is commanded by Prince Ee (who is a ‘political appointment’). Normally a member of the Imperial aristocracy, related to the Swan concubine no less, wouldn’t be seen dead serving in a subordinate capacity to a eunuch, however exalted. But such has been the success of the Southern Fleet (so much loot and bribes to be gained, and glory without much risk) that, well, one can hold one’s nose for the greater good.
The Ming patrol comprises -
Lotus Blossom (Assault ship)
Q4 C5: Drilled soldiers, Flagship, Heavy bow chasers, Reinforced hull, Sluggish, Square rigged, Sweeps, Unarmed, Veteran NCOs (66)
Bamboo Shoot & Bitter Melon (Wako auxiliary junks)
Q2 C2: Derring-do, Intimidating, Lateen, Reinforced hull, Yare (2 x 50)
Flying Fish (Reconnaissance airship)
Q3 C1: Lateen, Sweeps, Trained gun crew, Airship, Bow guns, Relay, Semaphore (44)
The Flying Fish is flying at ‘higher’ altitude (FWFT p11) unless otherwise stated. It has been signalling, no doubt relaying Information about Starkey’s ships to Ming reinforcements. This could be a bluff, but now is not the time to find out. Starkey must try to break out, upwind and past the patrol ships, to take refuge among the mudflats and mangroves of the Wessel archipelago until the heat is off. He starts the game with Initiative.
The wind is blowing along the table L>R, and didn’t change during the game.
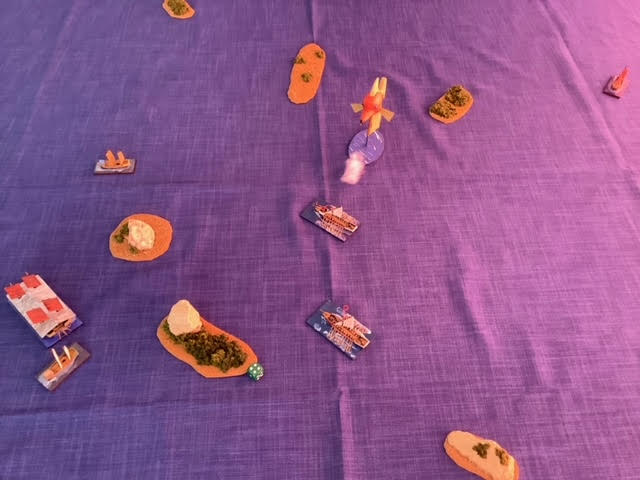
After 3 Turns it seems Starkey has committed his galleys to the S passage through the rocks, along the bottom side of the table. The junk is trailing at the top R corner of the table, as it battles forward close hauled. Prince Ee is manoeuvring the ungainly Lotus Blossom towards the likely intercept point.
But on Turn 4 The wily Starkey used the Yare ability of the galleys to switch course and wrong-foot the Chinese. The Lotus Blossom is responding by shortening sail and turning as fast as it can. Notably, this Turn saw the first shot fired by an aerial element in my G&G imaginary world. The Flyiing Fish took a shot at the Stella Artois, and was unlucky not to score a hit.
After 6 Turns both Prince Ee’s wako junks have initiated boarding attacks on the Chevalier’s galleys, and both have been captured by the galleys. In both cases the fights went two rounds, in which the wako suffered 2 damage per round. Very one-sided. They don’t make wako like they used to. In my first G&G game, some years ago, the same junks beat identical galleys, though not quite as easily.
The Lotus Blossom is continuing it’s ponderous manoeuvres, now under sweeps. The Flying Fish has continued shooting, at the Corona, now the boarding action has finished. It was again unlucky not to score a hit.
I ended the game after Turn 9, when it was clear Starkey and his squadron would escape the clutches of Prince Ee. The galleys set their prizes ablaze (by shooting faggots) after recalling boarders and retrieving grapples. The Lotus Blossom moved through the burning wreckage of the Bitter Melon and actually contacted the Corona, but didn’t have the activation point to grapple. So the galley slipped away.
Another good win for chevalier Oliver Starkey.
Unfortunately the manuscript in the archives of the Knights breaks off at this point, so we don’t know what happened next...