Tuesday 28 November 2017

Fantastic little racers

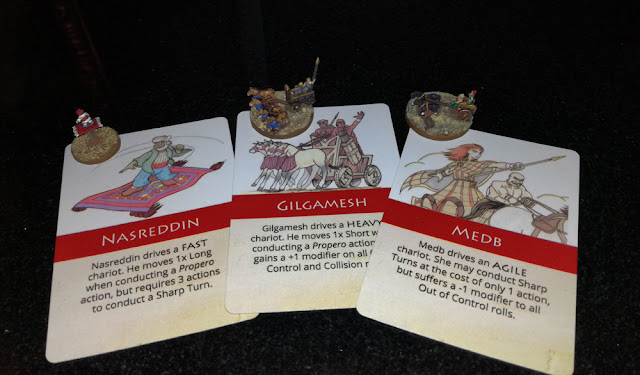
In the process of playtesting Faustus Furius, I collected two examples of each class of chariot in the game, leaving me with 14 chariots in all (including the flying carpet). Each chariot that I had was then used as inspiration for the turn order cards illustrated by local artist and gamer, Ewan Robinson.

Above you can see three of my racers - they've all been seen before, except now I have dry brushed some buff paint over the sand on the bases. This lightens the base, makes the figures pop a bit more (otherwise there is a whole lot of brown) and works better with my buff coloured racing track. 

Enter the wee lad. He is almost seven, and has recently started sowing an interest in daddy's figures. Rather than just buy him some figures with no purpose, I showed him a few of my games and asked what sort of figures he might like to play a game with. He'd just watched Radagast in the Hobbit movie trilogy, and liked the idea of of a chariot. He also liked the idea of spiders, and goblins, and skeletons... Trying not to get to carried away, I put in an order with Perfect Six Miniatures - actually, ordered, amended the order, and received the order all in a matter of three days!


A quick paint later, and I present you with the newest racers for Faustus Furius, Blood Fang and Ranzo. Chosen by the lad, painted by me, named by him. I have to say, the figures from Perfect Six were a real joy to paint - very characterful, tiny, wee sculpts.

Blood Fang is a spider rider. We decided that a spider would be good on the bends, so he is being used as an agile chariot. The lad wanted the goblin to be red, and who am I to fight creative genius?! Blood Fang's crash marker is just the goblin without the spider. presumably the spider has run off somewhere and needs to be called back. 


Ranzo is an orc boar-drawn chariot. I ordered two packs to make the active and crashed versions and was told that the active chariot needed all four boars to pull it. Ranzo himself is the orc archer on the back, Again, I followed instructions and had him firing backwards at the other racers far behind him.

In our first race, I took Nasreddin the fast carpet and Gilgamesh the heavy battle cart, while the lad took his to fantastic racers. The end result saw Gilgamesh come in last, then Nasreddin in third, Blood Fang sneaking into second place, and Ranzo speeding on ahead to snatch the first place! I demand a rematch!

Sunday 19 November 2017

L'Art de la Guerre 145 BC - Seleukid Dissolution

The year is 145 BC. Alexander Balas sits uneasily on the Seleukid throne in Antioch. The issue of his bastardy had been resolved through a marriage alliance with Ptolemaic Egypt, but now, as he grew tired of Ptolemaic interference, the court at Alexandria turns its eyes to his young cousin Demetrios Nikator. 

Demetrios, with Egyptian money, experienced Cretan mercenary generals and a large body of soldiers for hire, has landed in Kilikia. Alexander sends word to his Arab allies, and prepares for war.

The forces deploy somewhere along the north Syrian coast. Demetrios' mercenaries come down from the north (on the right). Leading the massed heavy infantry himself, Demetrios anchors the western flank on the coastline. One of his mercenary commanders brings the light infantry and elephants up behind, while to the other commander leads the cavalry to the east. The far east flank is protected by a steep hill.

Alexander's forces have marched up the coast from the south (on the left). The eastern flank is made up of Arab auxiliaries, the west flank is the small but able Seleukid royal army. An ambush is located in the woods in front of the Arab line, and the third command is curious absent.


Both lists are 100% legal, but some unit names have been changed to allow for the historic situation - Late Seleukid civic militia foot and horse are used to represent the less than reliable Arab tribesmen that fought for and against multiple Seleukid kings. Ultimately, Alexander would lose his head to one of his allied sheiks. But not on this day.
  
Alexander's regular forces. The Agema heavy cavalry are in reserve - just in case the small horde of yibbering Galatians don't live up to their fierce reputation.

Demetrios' infantry commands a low hill by the coast while hillmen make sand castles on the beach.


 Alexander's Arab allies prepare to hold the town and the woods in front of the camp.


Both sets of lines advance. Despite some marvelous CP rolling, the ambush in the woods prevents Demetrios from throwing his infantry forward too quickly. The Arabs are able to advance and fill the gap - exposing the fact that the ambush marker was a bit ephemeral to start with.


Alexander's horse archers start to outflank Demetrios' mounted division. In the centre, Demetrios' elephant corp pushes on towards the Arab camelry. Some of the Cretan skirmishers are able to move forward in support, but others get mired in among the heavy infantry.


Arab tribesmen take up a rather awkward position in the town while their bow-armed brethren make there way through the woods.


In the west, the Arabs hold the town and the woods. Arab skirmishing archers and camelry unleash volley after volley of arrows at Demetrios' elephants. Despite trying to hold back Alexander's horse archers with their own, Demetrios's mounted wing charges forward with wide open flanks.

 The disordered elephants charge home into the Arab camelry ...


... while Demetrios' Thracian mercenaries turn around and start heading back the way they camp. To form a camp guard, so they said.
  
At the same time, Demetrios' cataphracts plow forward into Alexander's infantry. Everyone watching that clash expected the horsemen to drop dead on the pikes, but to cleave straight through the Galatian warband. Surprisingly, none of the melee rolls proved decisive.

Demetrios' elephants destroyed one unit of camelry, but there then both routed by the remaining camelry and skirmishing archers. Demetrios' skilled Cretan mercenary general was killed by the routing elephants. The camelry then turned and took one unit of Demetrios' cataphacts in the flank. At the other end of the cataphract line, Alexander's imitation legionaries marched around to engage the other flank. 

Alexander's horse archers eliminated their opposites and started making eyes towards Demetrios' camp. At the same time, the Arab cavalry made their way through the elephant shaped hole in Demetrios' line and wiped out the elite Cretan archers.

While the inland - eastern - half of the battle was going the way of Alexander, along the coast, Demetrios' hillmen and imitation legionaries attacked the town. In the distance, the Arab cavalry ride over the Cretan archers and start forward towards the Thracian mercenaries who had turned to face Alexander's horse archers.

Demetrios' remaining mercenary general manages to keep his remaining cataphracts in decent shape, but his line is gradually worn down.


Back along the coast, Demetrios' forces sweep into the town and drive off the Arab tribesmen. One unit of Hillmen start approaching Alexander's camp.

With nothing better to do, Alexander's allied commander joins a unit of Arab skirmishers and leads them forward into some Cretan slingers. A camera with better zoom would have revealed the slingers' look of surprise, but unfortunately, none was at hand.


And just when it looked like everything was going his way anyway, Alexander's third commander with his glorious flank march decided to turn up! Exhausted, the Galatian cavalry would really play no further part in the battle.


So close! part 1: Demetrios' Hillmen can almost smell Alexander's camp. In the background, the Arab cavalry can be seen hitting the Thracians in the flank.


 So close! part 2: Alexander's horse archers can almost smell Demetrios' camp. 


And that was when Demetrios' army lost its nerve and started to pull back to the north. Demetrios lost all 23 morale/break points, while Alexander lost 19 of his 23. It was a fairly touch and go situation once Demetrios' infantry made it to the village, but at the end of the day, they were too slow in getting there. His pikemen - the core of Demetrios' army and his real strength over Alexander's forces, failed to meet any enemy head on. Demetrios' cavalry was too eager to charge whatever foe were to their front and suffered the consequences. 

Meanwhile, Alexander's elite Agema heavy cavalry just sat in reserve and did nothing, and his Galatian cavalry on the flank march was so late to the battle that it also had no real impact. The mediocre Arab medium swordsmen reinforced my existing poor opinion of medium swordsmen. If a 'man of the match' prize were awarded, I would give it to either the non-existent ambush marker in the woods, or failing that, the Arab camelry who managed to take on elephants and win!

Wednesday 15 November 2017

Ludi Hetairoi - The last bouts of the day

... and Edu from Hetairoi Wargames has now completed all eight bouts of his great gladiatorial rumbustification using my card and dice driven gladiator rules, Blood, Sweat and Cheers.

In case you missed it, the classic match up between the thraex Hermes and Crixus the murmillo was a real nail biter. Read about it HERE.

The final fight saw Scorpus the retiarius take on the two secutors Flamma and Astivus. The retiarius had the high ground, but would that be enough? You can find out how he got on HERE.

As for the winnings, the results speak for themselves really. All participants started with 100 sestertii and had to place bets on all matches. Delighted to have come out with a positive result; I certainly never expected to win considering I placed my bets according to which gladiator models I likes the best! The winner (or in this case, Tonijor, the runner up) gets a copy of the print and play rules courtesy of Ganesha Games.


Tuesday 14 November 2017

More scatter terrain

I am a wargamer. Therefore, I am inherently restless. I have enough projects* going on at the moment, but still wanted to do some hobbying with a change of emphasis. With that in mind, I decided to build some more scatter terrain. This is the first time I have made a terrain in any quantity since 2012, back when the world made more sense, and I posted what would go on to be one of my most popular posts ever (this one HERE).
----
*NB I realise that enough is really never enough, but I also have a family, and a job, and a puppy, so enough really should be enough.

I decided I needed a coastal zone, some more hills appropriate to smaller scale games, and may as well make a few more larger rough/wood template pieces as well. I ordered a pack of 50 trees off eBay (more on those in a later post I'm sure), and bought a decent sized (1200x800mm) piece of 3mm MDF. 


I first roughed out my design. The coastal zone runs up the right hand side here. You may be able to see the straight double lines of pencil set in 16 and 20 cm from the right. these allowed me to know that, even though my coast would be wavy, the joins would always be in the same place, so they could be a little bit modular. The lowest section was going to have a headland built into it.

The MDF was cut with a jigsaw. I ended up deciding that the 3mm MDF wasn't giving enough height to my hills, so I added in some slightly thicker pieces of cork-backed dining place mats that I had, at one stage, cut up to try and make snow drifts. The snow drifts were woeful, but they worked well in the hills.

All pieces were sanded back and stuck in place with PVA glue. Then I used silicon sealant around the steps to make them less steppy. Some old basing ballast was then scattered around the beach sections and the rough patches. The river sections are each 30 cm wide, as I have a 3 foot wide table.

Base coats of paint were applied. I find that tester pots of house paint work well when you want a range of colours. Obviously I was going for Mediterranean inshore teal-blue waters here, rather than the more traditionally Homeric wine-dark seas.

And here they are completed the olive sheet which we use when we need to cover my entire table. 

The headland - just crying out for a little stone circle or temple of Poseidon...

And here are the new pieces alongside some of my existing cork hills and rough/wood templates. The flock is a lot lighter and brighter, but otherwise, I think they fit in well. Not at all bad for a couple of hours on a Sunday afternoon.

Sunday 5 November 2017

The origins of Brexit - 1470something

Five of us got together to play an epic 400 point game of L'Art de la Guerre this week. Three of us played as the glorious suns/sons of York (War of the Roses Yorkists, two commands each), agains a coalition of  French Ordnance and Kalmar Union Scandinavians. The Yorkists were the attackers, and the battlefield was mostly open. Excellent for the heavy French and Scandinavian knights - not so great for all our longbowmen. Above, five commands of Yorkists to the left, six commands of Scandis (top right) and Frenchies (lower right). But wait... where for art thou, o' missing Yorkist command...?

As the Yorkists trudge towards the stationary French lines, the grand sweeping maneuver reveals itself too soon. My second command enters the table with little surprise and even less tactical acumen. At the top of the picture, the Scandinavian mounted and foot divisions advance, but the Swedish lord proves unreliable and hold back. The glory of French chivalry in the center, led by the king (a Charles, no doubt) advance to the crest of the hill.

My entire flank march is stalled by a combination of 1x French heavy infantry, and a succession of CP rolls of 1!

Over on the far side of the table, the Danish and Norwegian cavalry (and their German mercenaries), advance towards the English lines.

The continental cavalry smack home into the Yorkist lines. At the bottom of the shot you can see my entire command slowing coming to grips with the heavy infantry speed hump. Oh so painful to watch the ineptitude of my lord's command rolls.

Taking advantage of the reticent Swedish command, the Yorkists start to encircle the Scandinavian cavalry.

Meanwhile, the French cavalry go through the Yorkist centre and start to come out the other side! 

As the Swedish lord finally decides to commit, the Scandi cavalry is surrounded.
  
... but not soon enough. My elite foot knights are obliterated by bombards and shot at by Gascon crossbowmen. My flanking maneuver finally routes some foes, but not enough of them. The English mounted knights at this end of the table stall their charge (command pips!) and take repeated volleys of crossbow bolts.

At this point we called the game. The Yorkists had not quite broken, but were well on the way. The Europeans were mauled, but not as badly as us.

In the end, we called it a Swedish victory! The Swedish command was still untouched, and ready to sweep all others from the field. Unfortunately, the bloody nose received by the Yorkists on that field of battle left a cultural scar on the memories of its people. If they could not force Europe to their own will, then they would have no part of it in the future! Over 500 years later, we live with that legacy...