Sunday 27 November 2022

The is Not a Test - The Caravan

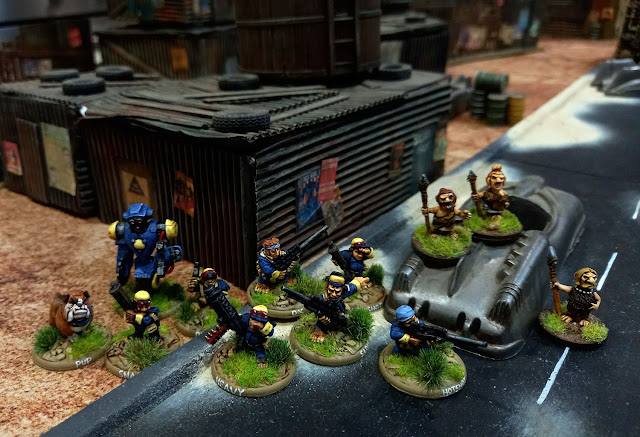
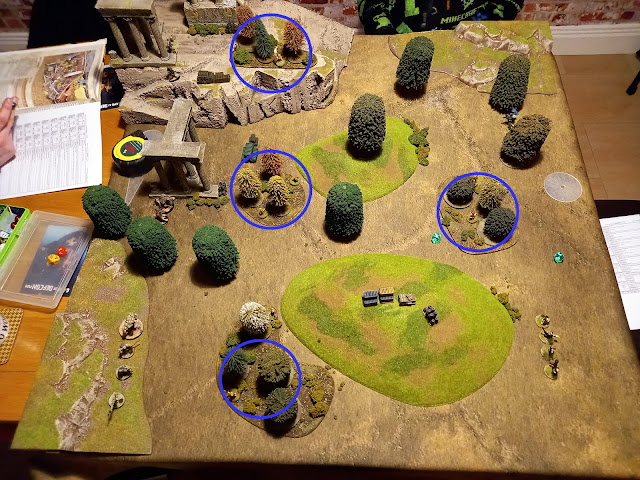
The Flores Minor Ranger Corp were out in the wastelands again this week, this time seeking to ambush Andrew's mutants as they escorted a caravan through an abandoned settlement. Unfortunately, they weren't the only ones. Mike joined in the campaign bringing a fourth warband into the mix; sadly, also mutants. So now it looks like a thin blue line of the FMRC (vainly) attempting to hold back a wave of mutant warbands from destroying what remains of humanity. 

Following on from the skirmish in the northern woodlands, the FMRC were accompanied by a new K9 - Pup - and the three hill folk adopted by Buckshot - Ogg, Snogg and Frygga.

Andrew's muties were now a veritable horde, especially when seen alongside the trade caravan. They started on the central road through the settlement, the FMRC were waiting in ambush on the right, while Mikes muties were in ambush to their left. 

Having to deploy on the very board edge was a bit disadvantageous to the FMRC given three of them have sniper rifles and another had a minigun - all of which are move or fire weapons. I split them roughly in two groups to pass through the left and right gaps in the fence line on my side of the settlement. However, the true kicker was when Mike decided to make it a night ambush, thereby negating every one of my crew's strengths by reducing shooting range to practically chare range. Mike's muties, it should be mentioned, are super-charged melee fighters.

The left group ducked forward to harass the flank of Andrew's convoy as it advanced. He sent that wretched mutant dog abomination to attack me again and between Heavy blasting away with his mini-gun and a shot from the back by Sarge, we managed to finally take the damn thing out of action for the first time in the campaign. 

Then a horny mutant with a blunderbuss scrambled forward and took out pup, another mutie knocked out Ogg, while Trench (a mutant with a grenade launcher,) scored a hit that took out Heavy, Demo and Snogg!

Meanwhile, Mike's mutants were ripping into the convoy from the other side. Hotshot lined up a shot at Mikes leader, but the huge beast just shrugged it off.

By this point it was clear that while Andrew's warband had the highest rating, Mikes were the bigger threat and I focused what remained of my crew on trying to take his leader down. As Andrew's mutants bottled it, Buckshot and BT29 blazed away at Mike's boss who then turned around and took them both down in melee. Once out in the open, both Doc and Hotshot tried to snipe him once more, but again he barely flinched as the sniper rounds pinged off his bulky body. At that point, the FMRC too bottled, leaving the spoils to Mike's muties.

In the post-game, poor wee Demo and my bot, BT29, could not be revived - two of Andrew's crew also died of wounds received. Both of my hill folk who were taken out of action, Ogg and Snogg, were banged up, while Heavy was mugged as he lay unconscious and woke up wearing nothing but a headache. The FMRC managed to recover a few barter script, but Mike's muties recovered a deactivated depend-o-bot.

The FMRC did not earn enough BS from the mission to replace its losses (poor wee Demo!), but Heavy replaced his equipment - now wielding an LMG rather than a mini-gun), and the entire squad did manage to go to 'Light Up The World', the flagship local torch store, to buy torches for every ranger with a gun. Henceforth, torches will be standard issue for the FMRC. I'm not letting THAT happen again.

Sunday 20 November 2022

10mm Fantastic Battles - the goblin horde vs ogres

I made my way down to Lisburn Gaming Club this week to lead my goblins into battle once more, taking on Roger's mighty ogre army for a game of Fantastic Battles. Now, my goblins are not the ideal army to take on something as monstrously tough as an ogre army, but I wanted to try out the new optional horde rule, so goblins it was.

The armies were very different in composition: my goblins had 23 companies - so a breakpoint of 12; the ogres had only 15 - so a breakpoint of 8 - but clustered in a few large units. The centre of the ogre force was a unit of four elite companies with the monstrous, doughty and heavy melee weapons traits - so 32 Resolve in a single company! My hoard of six irregular companies only had 18 Resolve!

Mishaps were negligible for both armies - one of my two units of wolf-riders enthusiastically moved forward, and the spider-riders and a giant on the far right were diseased. Among the ogres, their unit of cannoneers were delayed (behind a cyclops). Roger also kept a unit of yetis off the table on a flank march.

The opening moves saw both forces try to close the gap. Given the small size of the orge army, the goblins tried to apply pressure across the front, whilst sending units around both flanks. I wanted to pin the nasty elite unit in the centre, and pick off the weaker units. Of course, the term 'weaker' is all relative. Every orge unit had more resolve than anything in my army!

Early in the second turn, the yeti's arrived on the battlefield, arriving on the goblin right flank and hampering any thought of a wide outflanking manoeuvre on that side of the field.

On the left flank, the two units of wolf-riders were more successful, making a swift run around the far side of the settlement there. The ogres sent their cyclops to try to pin them in place, but he is slowed down passing through the settlement.


As the wolves continued their long march, the goblin battle-wagon trundled into the settlement to take on the cyclops.

On the right, the yetis charged into the flank of the spider-riders but were, in turn, outflanked by the giant.


The spider-riders were very quickly scattered - taking the flank's captain with them - but the giant managed to cause the yetis significant harm.

In the centre, pitiful shooting from the goblin horde left them little alternative than to charge in against the elite ogres. Charging into the front of the ogres, the horde was supported by a giant who charged the ogres in the flank; sadly the giant was then charged by the ogre hand-gunners.

In the tight spaces of the centre, the ogre mercenaries fighting for the goblins prepared to square off against their cousins, while the goblin king on his wyvern flew in to spew poison into the rear of the enemy. An impetuous unit of goblin redcaps had been vacillating between the yetis and the battles centre, but at least they too managed to get some ill-aimed shots off. Hard to see in this shot, a unit of goblin bat-riders flew over the elite goblins to drop down for an inconclusive fight against the unattached ogre warlord.

Roger's unengaged ogres attacked my own to the centre right of the battlefield, but the great battle in the centre continued to be inconclusive. The resolve loss was stacking against the ogres, and both the goblin horde and the giant were holding on - but only just. The goblin king flew his wyvern into the elite ogre's other flank, while the goblin bat-riders and rogue flew on to attack the ogre artillery to the rear and the wolf-riders finally made their approach for a rear attack.

As the goblin horde and their giant ally finally scattered, the wolf-riders charged into the rear of the elite ogres while the trolls slogged into their front. To the right, the yetis also managed to best the other giant, but were then charged by the goblin madcaps.

On the left, the goblin battle wagon and the cyclops continued to smash up the village, but eventually the cyclops got the upper hand (literally) and the wagon broke down.

On the right, the madcaps finally earned their rations by scattering the awful yetis that had so messed up my battle plan.

In the centre, both sides were counting up the resolve loss...

... and then the accumulated casualties proved too much across the battlefield. The elite ogres scattered, as did the ogre artillery, bringing Roger's ogre army to breaking point. However, the ogres and trolls fighting for the goblins also broke, bringing the goblin army to breaking point as well.

The battle was savage, and exciting, and I was sure the goblins were fighting a fool's battle against such a tough foe, so I was delighted (perhaps unreasonably so) with a bloody draw.

Over on the neighbouring table, Dave and Chris were also testing out the horde rule in a Celts vs Dark Elves battle. I wasn't following their battle too closely, but the Celtic horde proved a touch more successful than my own goblins. 

All players agreed that the horde rule is certainly viable as an alternative way to use irregular companies - it grants an added resilience and strength, but also weaknesses; it is in no way are they overpowered. Hordes are, in short, here to stay!

Saturday 19 November 2022

The battle of Koh Lan: Don Marco da Pattaya returns to G&G


Time for another dispatch from Mark who has returned to his Galleys & Galleons narrative campaign, bringing Don Marco da Pattaya back to active service. He hasn’t appeared since failing to prevent the Ming Chinese from capturing the KhiNok islands, three years ago, when he ended up clinging to the same piece of flotsam as An-te Hai.

*****

Now Don Marco commands a Portuguese squadron conveying ambassadors to the Siamese court at Ayutthaya. Expecting trouble from the militantly Islamic Prince of Songkhla, the Portuguese are ready to fight their way through. They have 414 points.

1 x Galleon (Sa Caterina da Goa) (106)
Q3 C4: Chaser guns, Drilled soldiers, Flagship*, Galleon rigged, Master gunner, Trained gun crews. *Don Marco scored the coveted “Dashing Commander” rating for today.

3 x Fragatas (Sa Barbara, Sao Jorge, Sao Martinho) (60)
Q3 C3: Chaser guns, Galleon rigged, Master gunner, Trained gun crews)

1 x Submersible ram (Baderna) (58)
Q3 C2: Ramming, Submersible, Unarmed, Unorthodox

1 x Dragao (Dragao) (70)
Q3 C2: Airship, Bombs, Fiery attack, Lateen rigged, Master gunner

Sure enough, as Don Marco’s ships head north up the Gulf of Siam, they find the Prince’s flotilla waiting for them near the small island of Koh Lan. The Songkhka side totals 392 points.

2 x Galeass (Banda Aceh & Hat Yai) (50);
Q4 C5: Drilled soldiers, Bow guns, High castles, Square rigged, Sluggish, Sweeps, Veteran NCOs.

4 x Galley (Ayutthaya, Borobudur, Songkhka, Srivijaya) (48)
Q3 C3: Drilled so,diets, Galley, Swashbucklers, Yare

2 x allied Pirate junks (Bean Sprout, Bitter Melon) (50)
Q2 C2: Derring-do, Intimidating, Lateen, Reinforced hull, Yare

Here is the tabletop (1800x1200mm) with Songkhka deployed to the R (N end of the table). The wind is blowing steadily from the SSW, diagonally across the table from upper L to lower R. It is not expected to change as the day wears on.


The Songkhla commander (Muezzinzade Ali Bashaw, aboard the Banda Aceh) has concentrated his galleys and galeasses to the W of Koh Lan, and left the E side to the pirate allies. His plan is to envelop the Infidels as they get closer.

Don Marco comes on in two columns, with the flagship heading the lee column The Baderna is way out to port, appropriate for a wildly unpredictable contraption. The Dragao however is closer to the Sa Caterina. His plan - possibly - is to cripple or sink as many enemy as possible with gunnery, avoiding boarding actions. His Sailing Master says he’ll need to tack at some point though, possibly when opposite the island, if he is to hold a course for the Chao Phraya estuary.

After 3 turns, here we are, looking S. In the foreground the Songkhla ships are losing formation as they come forward slowly under oars or sweeps, inevitably encountering activation fails. The Portuguese in the distance have also been affected by activation fails, but as their advance requires only compulsory sailing moves - for now - they’re not discommoded too much.


The Sao Jorge, leading the Portuguese weather column, is just under 2L from the nearest Songkhka galleys now, so we can expect shooting to commence at any moment. The Baderna is currently on the surface, but will likely submerge soon (this will be shown by a blue marker).

The Songkhla pirate allies are out of view to the L, coming around the island and heading for the Portuguese lee column (currently distant more than 2L).

Here’s the end of the first (Portuguese) activation / bound of turn 4. Three of their ships have opened fire, but to no effect at all. The Baderna has submerged.


In the Songkhla bound, the galley Ayutthaya attacked and grappled the Sao Jorge, but didn’t have the activation point to initiate boarding. The Borobudur came up in support, but only rolled 1/3 activation successes so the rest of the flotilla rested on their oars, though the pirate junks made their sailing moves.


On turn 5 the Portuguese began to make their gunnery felt. Here is the end of their bound. The two Songkhla galleys that launched an attack last turn (over on the R) were both punished. Sao Jorge cut the grapples before the Ayutthaya could board, and moved on, so the Sao Martinho, following, could shoot, causing 1 damage. The galley Borobudur fared worse: it was rammed by the Baderna and took 3 damage. The Sa Catarina got a lucky long range hit on the galley Srivijaya, causing a critical hit (holed underwater). Other Portuguese shooting failed, including a fiery attack by the Dragao against the Banda Aceh.


In response, the Songkhla Galeasses began to come about, but being sluggish are now stuck in irons as they ponderously change course to intercept the enemy. The allied pirates are more nimble. They have changed course too, and are now coming in at high speed. Of the galleys, Borobudur has given up and struck its colours, Ayutthaya has again attacked and grappled (but not boarded) the Sao Jorge. The Srivijaya and Songkhla are heading for the Sa Caterina & Sa Barbara.

On turn 6 the Portuguese continued to pummel the galleys. The photo only shows shooting that caused damage. The two fragatas in the weather line blew the Ayutthaya out of the water with two full broadsides, including one raking shot. The Sa Caterina slipped through the gap between the two pairs of galleys, but had no activation points left for gunnery. The Dragao audaciously attacked both galeasses in the same turn: dropping bombs on the Banda Aceh and making a fiery attack on the Hat Yai. Unluckily, both attacks failed.


Here’s the end of the Songkhka bound after casualty removal (Borobudur). The galleys Songkhla & Srivijaya moved towards the Sa Barbara and opened fire with their centreline guns, causing 1 damage, the allied pirate junks are entering the scene from the R after their long trek around the island. The galeasses are continuing to sluggishly change course, hampered by an activation fail as well as their poor handling qualities.


Turn 7. The Sa Caterina fired a raking full broadside at the Galeass Hat Yai, causing 2 damage and an under water hit in the critical damage table. The galleon is shown in its end-of-bound position, not the spot at which it fired. The next Portuguese ship to activate rolled turnover, so the rest of Don Marco’s squadron could do only their compulsory sailing moves (or in the case of the submerged Baderna, re-surface for want of a “remain submerged” activation point).


In the Songkhka bound the Hat Yai closed the Sa Caterina and shot it’s bow guns (which are its main battery), but unluckily this had no effect (it beat the galleon but had rolled an odd number). The pirate junks shot at the Baderna as it wallowed stationary, but their shooting was wild. The galley Songkhka was able to pivot, ready to re-enter the action, but damaged Srivijaya failed to activate.


Turn 8. Sa Caterina turned to starboard and fired a full broadside into Hat Yai at point blank range, but the underlying rolls meant it caused no damage to the Galeass. Baderna submerged again, and the three fragatas sailed on without shooting. The Songkhla ships are doing what they can to catch the infidels before they slip past. This photo shows the end of the turn.


Turn 9. Sao Jorge and Sao Martinho crossed in front of the oncoming pirate junks, giving the lead junk two salvos (not broadsides, not enough activation points after changing course), and followed by the Sa Barbara which did deliver a full broadside (not quite raking though). Together the three fragatas sent the Bitter Melon to the bottom.

The Baderna, not to be forgotten, popped up and rammed the other junk, Bean Sprout, causing 2 damage. Then re-submerged.

Meanwhile, the Sa Caterina shortened sail and waited for the smaller ships to rejoin. Here’s the end of the Portuguese bound.


I called it for Don Marco and the Portuguese at this point. The Songkhla flotilla has lost 1 Galley & 1 Pirate junk sunk. Also 1 Galeass, 1 Galley, and the other Pirate junk heavily damaged. And 1 galley has struck (but not been captured by the enemy).

The Portuguese have 1 fragata lightly damaged, and are well positioned to continue their run north to the Chao Phraya, with a fair wind and no enemy able to catch and fight them.

Don Marco celebrates his return to active service with another feather in his hat.

Tuesday 8 November 2022

Irregular Wars: Conflict at the World's End at Targe Wargames Show

It would appear that the good folk at the Aberdeen Wargames Club have been at it again, hosting another participation game of one of my rule sets, this time Irregular Wars: Conflict at the World's End at the Targe Wargames show (hosted by Kirriemuir Wargames Club).


The game was based on the Battle of Craibstone, fought in 1571 between the Forbes and the Gordons, part of the Marian Civil War. Craibstone was just outside medieval Aberdeen (since completely built over).

One spectator at the battle was a certain Elizabethan courtier and his associates. No doubt he was visiting his Aberdonian fish-salesman cousin when hostilities broke out ...

Not only did their table look amazing, but Aberdeen only went on to win both of the show prizes!

  • The Targe: awarded for the best club display. This was the result of a vote by all the attending clubs and groups.
  • The Crann Tara Targe: awarded to the best Scottish themed game or game with Scottish figures. This was the result of a vote by members of Kirriemuir Wargames Club - the hosts of the event.
A hearty congratulations to all involved! Pictured above - bearing the targes - are Sholto (who built the table) and Carlos (who built and converted the armies from various sources).

Sunday 6 November 2022

This is Not a Test - Pest Control

Andrew and I got together this week for another instalment of our This is Not a Test campaign. Once again, his mutants and my peacekeepers - the Flores Minor Ranger Corps - clashed, but this time, in the verdant green lands north of the wastes.

This time we played the Pest Control scenario: the mutants advanced from the left, the FMRC from the right, and both sought to irradicate what were supposed to be rad-zombie nests (the thickets within the blue circles). My son took control of half of the FMRC for the game, commanding BT29 the depend-o-bot, Hotshot (the hot shot sniper), and two rangers with shotguns, the veteran Snake Eyes, and rookie Buckshot. Hotshot was ranging out ahead, hidden under the tree on the central hill, while the rest were aligned top right. The remaining rangers, Sarge, Doc, Demo and Heavy were deployed bottom right.

Andrew's mutant band had swelled to 11 members for this match, spread evenly along his board edge. The muties were closer to three of the nests and Andrew thought to destroy them quickly to clean up on victory points.

My rangers made a quick dash for the lower hill (with a variety of crates to provide cover), planning to establish a strong point from which to dominate the nesting sites to their front and right. Their seemingly successful jaunt was short lived, as Andrew's wretched escaped slave girl-psychic played her mind games and sent both Sarge and Heavy fleeing from the engagement (having rolled critical failures on both of their Will tests). Seeing his NCO run off like that, Demo then proceeded to flee the battle leaving my force with just Doc; the same Doc who rarely manages a shot without jamming his gun. Later in game he did actually manage to down one of the mutant rookies, but his final shot of the skirmish was another matter...

In the middle, the mutants started clobbering the so-called rad zombies who turned out to be nothing more than primitive hill folk.

The mutant dog-creature was attacked, but managed to shoulder past the hill folk making his way towards his old nemesis Hotshot. The two have a history which generally involves the dog being shot but never taken out of action, and Hotshot being taken out of action in a frothing rage. Over the course of the engagement, Hotshot lived up to his name taking down three mutants. That made him an even riper target for the mutant doggo.

BT29, Snake Eyes and Buckshot assaulted one of the other hill folk nests, but only managed to take down a single critter.

At that moment, the mutant dog leapt on Hotshot with predictable results. The sniper was taken down, reducing the FMRC to 50% of their starting size. BT29 calculated the odds as insufficient and high-tailed it out of there. Snake Eyes' gun was jammed and he failed his activation roll, Buckshot passed his, but missed a shot at the slabbering dog. At that moment, Doc, the last sniper standing, levelled his rifle, targeted the dog, adjusted for wind, steadied his nerves, and jammed his gun. Again. The skirmish was over, and the FMRC once again bottled it and left the spoils to the muties.

In the post-match sequence, all the muties survived, with a few more colourful injuries. Andrew successfully weaselled his way into a COG bunker and a port-a-potty, coming away with sack fulls of barter script. 

For the FMRC, Hotshot was the only injury and he survived, although feeling pretty banged up. Both he, and BT29 earned enough experience to get upgrades - Hotshot working on his melee abilities, and BT29 gaining a new skill - Flurry of blows. Demo was offered a job as a hired gun but declined, and Buckshot managed to find and tame three young wasteland critters who will join the rangers next time.

Tuesday 1 November 2022

Onesie Wearing Wasteland Weirdos - Unicorn heavy

The Onesies warband continues to grow with the addition of Sven, the unicorn-onesie-wearing-heavy-hitter. Equipped with a sledge hammer, a cigarette and a heart of gold, Sven will add a touch of brute force to my crew for This is Not a Test.


Like Vixen, Sven was designed using Heroforge and then bought as an .stl file which I had printed by Crisis Actor Minis. Some of the detail in the sculpt is a touch soft, but as Sven's face is mostly in shadow anyway, it is no problem at all. The print quality was again superb.