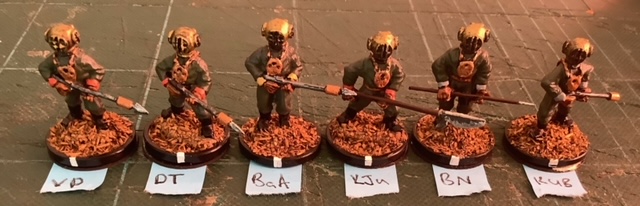
Sunday 25 February 2024

Mark VI Érineach Preservers - completing the squad?

Taking a slight detour from the painting schedule, I added a sixth Mark VI preserver to my beaky marine squad this weekend.  A little background for the rest of the squad was given back in October 2023. Now, a heavy-weapon toting chappie joins the crew as Brother F. I already have a wee tech support asset and a scout sniper and another five 40K 2nd edition scouts that can be scrounged out of the bits box if I ever need to add them.

I'm not sure when they will see action. I have very little interest in what 40K has become over the last 25 years really. Ideally I'd like to use them in an over-sized game of This is Not a Test  at some point, but should the need ever arise, I also now have enough painted marines for a Kill Team.


Saturday 24 February 2024

Devilry Afoot - Unleash the hounds!

This week I have focused on painting up canines for games of Devilry Afoot. To the left we have a companionable dog, loosely based on my own scruffy wee critter. On the right, the fearsome barghest. For scale I have matched them with a Bloody Miniatures pipe-puffing goodman in the photos below.

In Devilry Afoot, dogs are intended to be useful aids to a hunting party, but not necessarily savage war dogs, slabbering to tear monsters limb from limb. Hunting parties are designed to be made up of members of a normal community, not elite monster-hunters belonging to a secret society. They are unlikely to own dogs trained for hunting anything larger than a wolf and so dogs should not be intended to close with a monster. Think of them more as advanced warning systems that help the hunters to locate their monstrous foes. This perky wee fellow is from Magister Militum (now presumably OOP?).

The opposite extreme is the barghest. Sometimes known as Black Shuck, the barghest is a hellhound, summoned from the otherworld to wrack the Devil’s vengeance on man. Known for its giant black dog-like frame, and fiery red eyes, the baying calls of the barghest haunts the moors and boglands, serving as an omen of death and doggedly stalking its prey. Its ghastly appearance and ominous presence evoke a heightened fear matched only be the curse of its bite – the wounds of which are rumoured never to fully heal. The model is from Heresy Miniatures and is a truly hulking beasty.


Wednesday 21 February 2024

Devilry Afoot - How will you wendigo...?


When it came to adding a North American monster to Devilry Afoot's book of monsters, there was only ever one obvious choice; the wendigo. The big question, was how to represent one on the table.

Wendigos, also known as windikouk, atchen and kewok among other names, are cursed, cannibalistic revenants found among the Algonquin nations. Their badly-lived lives have left them tormented in death with a hunger that can never be fulfilled. Although they are able to take on many forms, a wendigo is forever emaciated; standing grotesquely tall, its frame is draped in tattered, frost-covered skin They stalk their human prey consumed with ravenous appetite, however, with each meal their frame grows larger forcing them to hunt and feed again.

The standard wargaming trope is to have a creature with a deer or moose head. While the look is quite iconic, as far as I can tell it seems to be based on a Hollywood manifestation of a wendigo rather than anything coming from traditional beliefs. 

Wanting to be as 17th century accurate as I could be, I opted for this oversized ghoul from Heresy Miniatures. Admittedly he doesn't look huge next to the Bloody Miniatures figure in the top picture, but Bloody Miniatures are big boys themselves. He should probably be bigger and more rangy; maybe he hasn't been feeding much recently? The feral pointed years and sinewy body go some way to fitting the bill though.

I tried to paint him as sympathetically as possible, with a warmer than usual skin tone (a curious choice for a frozen wendigo?), Algonquin inspired warpaint, and scraps of buckskin clothing. Presumably he's wielding a moose femur as a war club, because that bone is massive!

Monday 19 February 2024

Fantastic Battles 28mm - Alexandrian Macedonians vs the Bacchae

Taking the my 28mm Bacchae out to stretch their legs, I headed down to Lisburn Gaming Club last week to take on Roger's 28mm Alexandrian Macedonians in a pseudo-historical clash of (metaphorical) giants!

In a typically Alexander move, Alexander (top of the picture) massed his cavalry on his right and took command of one of the units of elite companions himself. The second unit, led by a captain, were overly enthusiastic and deployed far forward of the rest of their lines. A unit of Thracians led by a rogue were late, deploying behind the wood, while the main phalanx also deployed a little forward. The hypaspists on the Macedonian left, and the various small units of archers interspersed around the infantry (mostly) maintained their lines.

Dionysos had an easier time with mishaps; only the nymphs were stricken with disease. On the Bacchic left, a unit of leopards were deployed slightly forward in ambush in the woods. Next came an elephant in front of the yakshi maiden guard, a horde of satyrs, and a smaller unit of centaurs led by Papa Silenos. The nymphs (a magic using character company) held the woods in the centre, while maenads led by Pan and the erotes chariots led by Eros held the Bacchic right. 

As the battle opened, the enthusiastic companions continued to move forward, putting themselves in the live of fire for the mixed shooting unit of satyrs and the centaurs, both of whom peppered them with arrows. The centaurs moved forward to get into a better position and the yakshi maiden guard started to redeploy around to the right of the satyrs. The nymphs in the centre moved forward towards the edge of their woods as the fearsome Macedonian phalanx advanced. 

On the other flank, both forces advanced cautiously.

Over on the left, Dionysos cast confusion on Alexander and his companions, forcing them to rush forwards into the leopards. I made two crucial mistakes at this point: 1) I had brought the leopards too far forward meaning that the companions were not inside the woods enough to suffer melee penalties, and 2) I forgot that the companion movement should have been reduced by the woods to such an extent that they shouldn't have actually completed their charge at all... These two points were to have implications. Having committed to the melee regardless,  Alexander was then charged in the flank by the Bacchic elephant.

The other unit of companions also charged forward with a thud into the satyrs, while the Macedonian light horse hit them in the flank.

In the centre, the nymphs cast entangle on the phalanx, pinning it and the two attached characters into place.

Meanwhile, the maenads and hypaspists sized each other up, while Cretan archers made themselves felt by the erote goat chariots.

Having messed up with the leopards, they broke and scattered after a single round of melee, allowing the companions to turn to face the elephant alone - not theat it did them much good, scattering soon afterwards and carrying a mortally wounded Alexander from the field. The centaurs came to the aid of the satyrs as the Thracians emerged from the long walk through the woods. The nymphs continued to pin the phalanx with entangle spells.

The maenads clashed with the the Macedonian hypaspists and a single unit of impetuous archers who were in-turn charged by the chariots.

With most of the Bacchic army committed, the battle hung in the balance... but a really badly weighted balance.

In one go, the second unit of companions and the Macedonian light horse, together with the satyr horde and elephants all broke and fled. Dionysos was suddenly conspicuously lonely. 

The army breakpoints now sat 9/10 for the Bacchae, and 6/10 for the Macedonians.  

Sadly, despite their thyrsoi heavy weapons, the maenads were no match for the hypaspists, and the broke and fled, as did the archers before the chariots. 

But it was enough to break the Dionysiac army (13/10), without quite breaking the mundane Macedonians (7/10). It was a fun game, even though I did mess up with the leopards, bringing the Baccahe to their first defeat.

Sunday 11 February 2024

Into the Woods with Devilry Afoot

Devilry Afoot is the new folk-horror game being developed as the next Irregular Wars title. Followers of this blog may have seen the gradual process of painting humans and monsters over recent weeks and months, but throughout that time, there has also been extensive playtesting with 47 experiences in the game recorded so far from players spread across Europe, North America and East Asia. The rules are still being amended and tweaked, and it is hoped that next few months will see many more games played so that an enjoyable balance can be ensured between challenge, fun, simplicity and complexity.

There are currently 11 scenarios in the draft rules, although I would expect there to be at least one more. This, the first after action report to be shared publicly, is an account of one game playing the “Lost in the Woods” scenario.

Lost in the woods
They knew that they should not have been awake at such an hour, let alone out of doors, but neither child could sleep. It was as if something called to them through the woods which seemed, at this hour, so alive; something irresistible. When the children’s absence was noticed, the alarm was raised and a search party set out in their wake.
 
For this scenario we used a search party of four hunters: three characters and a follower. Second from the left stands Nathaniel Swiftsure Esq, a much-respected member of the local gentry who hides his alcoholism behind an outwardly moral edifice of probity. Nathaniel carries a sword and is accompanied by his follower, the young Mary McLean, a servant in the Swiftsure household, equipped with a flintlock pistol worth much more than she is.

To their right stand Sergeant Malone, a veteran of the war and skilled huntsman, carrying his trusty sword and a heavy horseman’s pistol, the dragon. Malones experiences on the front lines has left him questioning the very existence of God – a dangerous thought in these troubled times. Keeping a close eye on the rest of the party is the devout Reverend Cooke. Bearing a holy item and a lantern, Cooke secretly worships to old gods and can summon a familiar if the need arises.

The table is laid out as an open woodland edged by a river. At the centre is an old pagan altar, and two lost innocent children. The innocents’ actions throughout the game are automated, determined by their situation.

Beyond the altar are two bogeymen, in this case, living scarecrows, out to snatch away the children.

To further complicate matters there is also a pact devil – a wee leprechaun – resting by the river, hoping to lure the innocent astray.

The scene is set. In the darkness, the innocent, while unaware of the bogeymen, will always be drawn towards the pact devil. If one of them makes base contact, both the leprechaun and his victim will be whisked away to the otherworld. Meanwhile, the bogeymen will be erratically lurching through the woods looking to cause harm. The hunters need to rescue both children from harm in order for the scenario to be successful.

A game, or hunt, in Devilry Afoot takes place over a number of turns. During each turn, all models on the table will have the opportunity to be activated one or more times. The order in which models are activated in is determined randomly by drawing initiative tokens from a bag. Each character has one token added to the bag, while different types of monsters have multiple tokens added. Hunters have the chance to activate twice each time their token is drawn, monster only act once. However, bogeymen have four tokens – whenever a bogeyman token is drawn, both bogeymen activate with their action determined by a d10 dice roll, so the monsters might get up to all sorts of mischief in between hunter actions.

The first turn saw the four hunters move up to put themselves between the bogeymen and the innocents. One of the bogeymen took the bait and started off towards Swiftsure (as the nearest human (with Mary approaching from its flank). The other bogeyman was still nearer the innocents and so shambled off after them. The wee girl wandered absent mindedly towards the pact devil, but the boy caught sight of a bogeyman and became alert.

Swiftsure ran up to the closest bogeyman, delivering a powerful blow which caused two wounds to the beast. Mary only managed one action, so could only move closer, not actually provide any real support.

When the innocents activated next, the alerted lad moved passed the girl, making her aware of the monster threat. Both now moved towards the river bank and safety.

The second bogeyman kept on towards the innocents, passing through a patch of hungry grass.

Rev. Cooke started moving towards the bogeyman in the hungry grass, but then got other ideas and diverted towards the pact devil.

The innocent made it to the safety of the river bank (technically moving off the board and completing the scenario), while Swiftsure and his monstrous opponent took poorly aimed swings at each other.

That bogeyman erratically fled from the combat before Mary could bring her pistol to bear.

Rev. Cooke sidled up to the leprechaun and struck a deal, gaining a wound, but also revealing a new vice – not only is he secretly a witch, but he is now also a backslider. Should he gain followers in the future, he’ll risk losing them if they discover his secrets.

Swiftsure and Mary pursued their bogeyman, Swiftsure making ineffectual swipes, but the bogeyman being just as rubbish in the melee. Mary managed to fire off a shot, causing another wound to the monster.
But then the bogeyman lashed out, brutally taking out Swiftsure in a single swipe. Mary was left stricken, and alone.

Malone, who had dithered about in the woods up to this point now swept in as a hero, firing off his dragon dispatching the monster in an explosion of straw and tattered cloth. The following turn, he spun around and engaged the second bogeyman who had emerged to his rear. In a struggle so quick and fierce that no photos were taken, he managed to eviscerate that monster too.

In the post-game sequence, Swiftsure managed to recover from his wounds without suffering any permanent injuries. Rev. Cooke walked away with an improved constitution, while Malone took the lion’s share of the experience. The party earned a bounty on each of the bogeymen, and an extra reward for bringing both children back to their village unharmed.

Friday 9 February 2024

PDEE: Pulp Underwater - When Squid Attack

Mark's last Paleao-month dispatch using his own underwater adaptation of Palaeo Diet: Pulp.

This adventure from the Mesozoic time-travel world of the Utterley-Barkinge Company (NL) takes us back to the early Jurassic , about 100 MYA. It uses the “Predator” scenario suggestion in the PDEE rules for a bit of role reversal. This time the human hunters are the hunted, and the usual beasts (in this case, Squid, Ichthyosaurs, and others) are the hunters.

A party of six time travel tourists, including their guide, is on a walking tour through a spectacular canyon on the floor of the Mid-Atlantic Rift. Four of them are armed with spear guns (spears) and two with glaives (clubs). Those armed with spearguns will close to shooting range and shoot, when they get an Attack reaction, if possible.

Here’s a group photo of the tour group, taken as they started out on their trek. From L-R: Vlad Putin, Donald Trump, Bashir Al-Assad (spearguns); Kim Jong-un, Binyamin Netanyahu (glaives). And on the far R end is Karl Utterley-Barkinge, the tour guide.


And here are the predators who fancy snacking on these interlopers: 3 x Ichthyosaurs, 3 x Squid (all Pack predators), 1 x Ammonite (Apex predator), and the customary starfish (special rules: is in permanent lethal Predate mode for wounded or dead tourists, always moving 1S per activation towards the closest).


The tourist figure is for scale purposes.

The table cloth is 900x1350mm (3’x4’6”). That is 8 Lopes, or 12 Ambles, or 18 Skulks. The tourists must traverse the length of the table to reach safety at the far end. Their air supply will last 10 + 1D6 turns (calculated seperately for each figure on turn 9 if necessary). Each tourist must attempt to activate on 1-3 dice after all other turn activity has finished. They may only use their successes to move or stay put, not to attack, shoot etc. If they leave close contact with a predator they suffer a free hack.

All terrain features are impassable to both predators and prey.

*************

Here’s the tabletop, with KUB leading his group on at the near end. Their destination is the shelter dome at the far end. The Squid are at lower R, the Ichthyosaurs are in the middle, close to the starfish. The Ammonite lurks at upper L.


All predators initially activated using 1 dice only. All passed but did not move. So the tourists moved. Their various dice fails meant the group began to spread out, just as you’d expect from this party of psychopaths and narcissists, and they showed no signs of cooperation.

Action began on turn 2 when the first Squid failed an activation, and Netanyahu, the closest tourist, Attacked towards it. The squid then moved into contact and wounded Netanyahu. An identical chain of events led the second Squid to wound Bashir Al-Assad after he missed his shot. The third squid joined the attack on Assad but failed to cause another wound, and Assad reacted to the new attack by wounding the Squid. Plenty of blood in the water, and the Giant Starfish stirs. 

Two of the Ichthyosaurs also failed 1 activation dice each, and the closest tourists reacted with a Move Away (Trump) and Attack (Utterley-Barkinge). The Ichthyosaurs circled around Utterley-Barkinge, provoking 2 x Alarmed reactions as he fell back towards the others. The third Ichthyosaur succeeded on 3 activations and loped around the L flank of the tour party. Planning mischief no doubt.

The Ammonite moved slightly, to lurk in an ambush position.


At the end of the turn the four tourists not in combat all moved forward and stayed closer together than previously. But there was no move to help the two tour members battling the Squids.

Squid #1 killed Netanyahu, after failing an activation dice which allowed Bibi to attack first, but he failed. Squid #2 killed el-Assad, no problem. Squid #3 used two activations to attack Kim Jong-un, but first had to take an attack from him as it came within M of him while ambling. Kin wielded his glaive skilfully, landing a well-placed blow but failing to convert it I to a second wound. But Squid #3 had 1W already, so Kim actually brings down the first predator. 

Then the Ichthyosaurs began their attacks. The first to go fluffed 1/2 activations. Utterly-Barkinge, the closest tourist, got an Attack reaction and shot at the Predator but missed. It moved into contact. The second Ichthyosaurs got a triple activation and and skulked up behind Utterley-Barkinge, causing 1W. The third Ichthyosaur, out on the L, also got 3 activations and cruised in towards Kim Jong-un as he was standing next to his trophy Squid. Kim Roared (blew bubbles?) as the Ichthyosaur came within M, but unintimidated it pressed the attack, but failed to wound Kim. 

Elsewhere the Giant Starfish continued creeping towards the closest casualty, and the Ammonite stayed in ambush.

There are only 3 tourists to move this time. Two are dead, and another (Utterley-Barkinge) isn’t going to try to break off with two Ichthyosaurs in contact. Putin, Trump, and Kim all move forwards past U-B and the Ichthyosaurs, ending in a tight - dare I say mutually supporting? - formation. 


The two remaining Squids both fail 1/3 activations this turn, but no tourist is in LOS to react. The Squids move under cover, parallel with the tourists and on their R.

The Ichthyosaurs resume their attacks. The first, already in contact with Utterley- Barkinge, fails 1/2 activations. U-B gets a Flee reaction, so must take free hacks from both Ichthyosaurs. He is torn to shreds with total 4W including the one he already had.
The second predator then succeeded on 2 activations, skulking into contact with Kim Jong-un and causing 1W. The third Ichthyosaur failed 3/3 activations, stranding the Ammonite this turn, tho the Starfish and remaining tourists can still activate. 

Putin and Trump run for it, abandoning Kim. And yes, I rolled contingency dice for their reactions. It’s funny (!) how these things work out. 


In the photo above, at top R the Ichthyosaurs are working over Utterkey-Barkinge (dec’d) and Kim Jong-un (1W). In the C our two heroic tourists  are heading for the exit (at L). But what is that at bottom R?

The Ammonite gets a triple activation. It skulks into contact with Trump, but somehow fails to wound him. He reacts by Attacking the Ammonite, but fails. 


Now it’s the Squids’ turn. Squid #1 fails 1/3 activations, and Putin, the nearest Tourist in LOS, reacts by resting. The Squid then jets towards him. Putin turns and Attacks (shoots) as the Squid gets within L, and he kills it with a successful 2W well-placed blow. Squid #2 also gets only 2/3 activations, and moves forward but more circumspectly. 

The Ichthyosaurs now get back to work. The fight between the Ichthyosaur and Kim Jong-un continues inconclusively. The next one moves around to the L, bypassing the Ammonite. It comes within reaction distance of Putin who flees away from it. The last one joins the attack on Kim, surviving a Roar reaction by him as it approaches, and delivers another 1W, consigning Kim to his ancestors. 

At the end of the turn Putin resumes his movement towards safety. Trump - another contingent roll - decides to risk turning his back on the Ammonite and running too. He takes 1W from the free hack, and only a single move activation. 


Trump and Putin should be able to make the Dome if they can survive this turn, and activate to move again.

The nearest Ichthyosaur gets a triple activation. Skulk, skulk, attack. It dishes Trump a second wound, and he is dead. But then the Ammonite rolls a double activation fail. So Vlad Putin gets to move again, rolls well, and makes the safety of the dome.


The game was over in only six turns so the question of air supply didn’t arise. Five of the six tourists were killed by the predators, and two predators (Squid) were killed.

Thursday 8 February 2024

Palaeo Diet: Pulp - the Totally Legitimate Antiquities Corp digs Nongprue

Mark continues his Palaeo Diet month with another Pulp game:

We last met this dodgy outfit back in January 2021 when they pulled off a smash & grab raid on the priceless artefacts of Tel el Pattaya. Now they are back, with different “archaeologists”, to survey the ancient Mayan ruins of Nongprue in deepest Central America. 

Here is the team who will be undertaking this absolutely above-board and fully approved work -


Front row L-R: Lara Garrod (who is a Naturalist), Angelina Kenyon (Occultist), and Lyra Belacqua (Addict), the Adventurers. Behind them, some local “Hounds” they have hired as troubleshooters. “It’s just an expression snowflakes”, says Angelina, the Adventurers’ leader. “Get over it. They’re all called Pablo, or Sanchez, something like that.” She added “it’s not like they are Goons or anything.”

The adventurers and hired help are all are equipped WYSIWYG. 

And here is the trouble they may need to shoot -


In the rear, some Giant Armadillos with thagomisers, spirit guardians of the Nongprue site. In front, Great Mummies and Lesser Mummies, resurrected Mayan nobles and proles, all armed with bows (bows or atlatls). Mummies who get Attack reactions will shoot if possible.

The Armadillos and Mayans will appear when triggered, usually at 1L from the trigger event. They are triggered by Adventurer activation fails and wounds suffered, artefact collection, and so on. 

The ancient ruins of Nongprue contain some remarkably well preserved step-pyramids, a ceremonial platform, and various stelae. But the Adventurers are here for the portable loot, represented by 7 yellow tokens distributed around the site. They have to collect as many of these artefacts as possible, and get them off the site via the same access point as they entered. It’s the only way in and out to the helicopter pad. One Adventurer can carry up to 3 tokens. 

Here’s a high level view of the scene, possibly taken by Lyra Belaqua’s Flying Monkey drone (which I didn’t use in the end. Maybe next time). The hunters / adventurers are coming in through the entry point at the bottom edge. Some of the yellow artefact tokens are visible. Those not in view are in jungle patches.


*************

The three adventurers decided to start of climbing the blue pyramid, as it’s a likely spot to find an artefact, and may be a coign of vantage for spotting more. Lara leads off, a lope and 2 skulks takes her to the top. Angelina and Lyra follow - all have started with 3 successes. Now the Hounds attempt to activate. Two succeeded and moved around the E side of the pyramid. Two others failed on one dice, and followed their employers, stopping to the foot of the stairway. The last failed two dice and stayed put for now


Lyra pocketed the artefact found on top of the pyramid, while the others took in the view, noting the positions of a further 4 other artefacts. But fails by Lara and Angelina meant two Defenders materialised - both Armadillos as it happened. The two hounds at the foot of the stairway spotted one of the Armadillos, and took shots at it with their rifles. The first shot hit, and the Armadillo moved away. The second shot also hit, and the beast retreated off table with 2 wounds. One of the other Hounds was able to shoot at the other Armadillo (which didn’t hear the prev gunshots), wounding it, and the beast moved away. 


The hunters will now split up, each to collect one of the artefacts spotted from the top of the pyramid. They will take 1-2 Hounds each. Lara descended to the bottom of the pyramid, W side, but a fail meant she had to stop there, and a Great Mummy materialised 1L away, between her and the artefact she was hunting. It lunged towards her, but was too far away to make contact. Then Angelina moved down the N side of the pyramid, but also stopped at the bottom because she had had to travel further. Lyra moved down the E stairway, also stopping at the bottom because of a fail. Another Armadillo appeared 1L away and lunged towards her. 

The Hounds all failed an activation so ambled to their designated masters, except one, assigned to Lara, which was able to take a shot at the Mummy but missed. The Mummy reacted by Summoning a Lesser Mummy, which appeared halfway between the Great Mummy and Lara. 


Now it’s turn 4

On the W side of the pyramid: Lara activated on 2 dice, and used her pistol to shoot at the Mummies, causing 1 W to the Lesser Mummy, which Summoned another Lesser friend. Then in response to noise of the gunshot both Mummies summoned another Mummy. There are now 5 of them. Her second shot missed, and the Lesser Mummy that was the target Cursed her. Then all five Mummies responded to the second gunshot noise. 1xRoar, 4xLunges. Lara failed all 3 dice (all are Stress dice because of the curse) on her reaction to the Roar and retreated up the pyramid steps. The Lunging Mummies cannot reach her. 

Lara’s 2 Hounds activated next. One failed a dice and so hung around (it cannot reach her because of the Mummies blocking the steps). The other successfully activated and moved into contact and attacked the Mummies, destroying the nearest Lesser Mummy but taking 1W itself. 


Over on the E side: Lyra failed 2/2 activations and a Great  mummy appeared 1L away from her. And the Armadillo attacked her, causing 1W. Lyra fired her rifle into the air, hoping to force it to go away, but it attacked again, and Lyra Bellacqua is dead. Her Hounds, temporarily without a master, will activate last. 


On the N side: Angelina activates on 3 dice. She isn’t taking any chances with the wounded Armadillo so close, and skulks all the way over to the 2nd Artefact on the ceremonial platform. Her Hound ambles after her. The Armadillo rests.


The two Hounds formerly attached to Lyra both activate successfully. I rule they will shoot at the Armadillo that killed Lyra. All shots miss, and the beast gets varied reactions but in the end moves away leaving the Hounds unscathed.

Turn 5 now. The hunters are in a tricky situation. One is down (with an artefact in her pocket). One is stuck atop the pyramid, and Cursed, with several Mummies chasing her. Only one has reached another artefact, but not yet collected it. 

On top of the pyramid, Lara succeeds with two (stressed) activations and frees herself from the Curse. Her Hounds both attack the Mummies, one fails (but survives the Mummy’s reaction), the other, already wounded, is killed without inflicting any damage.

On the ceremonial platform, Angelina pockets the artefact (a Greater Mummy appears 1 L to her S), and she Ambles SW towards the next Artefact, carefully keeping away from the Mummy. Her Hound ambles after her but strays too close to the Mummy, which … Moves Away.

The two Hounds of the late Lyra climb the pyramid to join Lara. I rolled a contingent dice to see if Pablo, the brighter Hound (wearing the purple shirt) will search Lyra’s pockets first. Yes. The artefact transfers to his pocket. 

Turn 6.

Angelina, moving carefully towards her next artefact, fails 1 activation, and a Lesser Mummy materialises. Luckily it’s not blocking her path so she keeps moving. But her Hound attacks the new Mummy, causing it 1W. 

Lara, atop the pyramid, gets 3 activation successes. She moves across and down the opposite (E) stairway. The two ex-Lyra Hounds, now Lara’s Hounds, follow.

Lara’s former hound, last seen attacking the cluster of Mummies at the bottom of the W stairway, transfers to Angelina who is the closest adventurer in LOS. It keeps attacking the Mummies though. Neither side lands a glove on the other.

So here is an overview of the position after 6 turns.


Angelina and Lara, the surviving adventurers, are marked with white dice. The surviving Hounds are marked with red dice. Mummies are marked with yellow dice. The Armadillos are visible enough to not need markers. Red tokens show wounds.

2/7 artefacts have been collected. Angelina has one. Pablo the purple-shirted Hound (red 2 spot dice) has the other. So far he hasn’t handed it over to Lara his new boss. He’s probably been too busy.

Turn 7. Angelina and Lara try and salvage some kind of win from this sticky situation.

Angelina activates, ambles over to the next Artefact, and pockets it. She now has two. A lesser Mummy appears 1L away, but in a position where it is unlikely to cramp her actions.

Both her Hounds are in combat contact with Mummies. The one in LOS activates successfully. It backs away and shoots at the Mummies, focussing on one that is already wounded, and downs it with a second wound. In response to the first (failed) gunshot the target Mummy Roared, but the Hound was too far away to notice.
The responses of the other three Mummies in proximity, to the noise of the shots, was a Lunge + 2 x Attacks, and the Hound was killed.

The other Hound also successfully activated, and tried the same trick, stepping away and shooting at its wounded Mummy adversary. The first shot missed, and the Mummy Roared, forcing the Hound back 1S. A Greater Mummy further inside the Jungle also reacted to the noise, and Attacked but was too far away to make contact. The Hound fired again, a lucky shot which added a second wound, so the Greater Mummy is now 2W. It lunged at the Hound, wounding it.


On the other side of the pyramid, Lara succeeded in a triple activation, and skulked past the Armadillo and around the rock pile towards another Artefact. One of her Hounds skulked towards the beast. It couldn’t contact the Armadillo so it shot at it, causing 1W. The beast moved off table, Alarmed. The other Hound (Pablo) ambled after Lara, attracting no attention from any beasts.


Turn 8. Lara activates first, but fails 1/2 dice. Another Armadillo appears, at the same place the other one just left the table. Lara moves into contact with the artefact, but cannot collect it this time. Hound Pablo stays with her. The other Hound ambles towards her, attracting the momentary interest of the new Armadillo, but it rests.

Angelina also fails 1/2 activations. But no new beast appears (rolling to see what kind of beast saw all dice come up the same). However the nearest beast, the Lesser Mummy that materialised last turn, activates and make a Lunge move, but is way too far off to be a threat. Angelina skulks off towards a nearby jungle patch, which she feels could be hiding an Artefact. Her remaining Hound, who is out of LOS and fighting a Greater Mummy, breaks contact and Ambles towards Angelina, ending up in the jungle patch.


I’ve used coloured dice for figure ID again in the photo above. White for Angelina (lower L) and Lara (mid R). Red for Hounds. Yellow for Mummies, with Y6 for a greater Mummies and Y1 for Lesser. And nothing for the Armadillos. I just noticed an R5 dice in the foreground - it is an error.

Turn 9. Angelina activates successfully this time, skulking into the jungle and reaching an Artefact. Her only remaining Hound skulks towards the nearest beast, the wounded Lesser Mummy on the N side of the jungle patch, but cannot quite make contact.

Lara fails 3/3 activations. The nearest beasts are the two Armadillos and the Greater Mummy near the rocks. The Armadillos are not interested, getting Move Away and Rest
Reactions. The Mummy also gets Move Away. Lara’s hounds stay with her.

Turn 10. Angelina pockets the Artefact. She now has 3, the maximum she can carry. Giving the Mummies a wide berth she heads for the table exit point.


Lara also moves into contact with her Artefact and collects it. Her 1 activation fail brings on another Lesser Mummy, at 1L towards the red pyramid, which as it happens is where she wants to go next. Pablo stays with her and so does her other hound, but he starts howling. He wants his mummy. Luckily no beast can hear him.


Turn 11. Lara decides to forego the Artefact she can see on the red pyramid. It’s too risky. She fails 1/3 activations, and another Lesser Mummy appears next to the red pyramid. So off she goes, heading in the other direction, towards the exit. Pablo sticks with her but the other Hound heads towards the Armadillo.


Angelina fails 2/3 activations. Only 1 new beast, a greater Mummy, appears. And her luck holds, it’s behind her. Of the two closest beasts that react to her fails, one gets Move Away, and the other gets Attack, and closes in but cannot contact Angelina. Her Hound, way over on the other side of the jungle patch, ambles back through the trees to catch up.


Turn 12. Lara gets a triple activation, all sixes. I’ve been waiting for a sign from the dice Gods like this: Lara shoots Pablo in the back. He falls - wounded or dead doesn’t matter - and Lara searches him and takes the Artefact he looted from Lyra. Lara has been suspicious for a while, but has been waiting the moment to strike. Then she keeps moving for the exit. Meanwhile her other Hound attacks the Armadillo, fails to wound it, and the beast flees off table.


Angelina’s luck seemed to have run out as she fails 2/3 activations. The nearest beast, a Lesser Mummy, attacks but fails to wound her. The next closest gets a Lunge reaction but it’s much too far away. Angelina runs for it, and both beasts fail to pursue her. Her faithful Hound activates successfully and stays between her and the other beasts.


I played the final couple of turns, involving only figures that could affect the result. Lara got through the exit gate in turn 13, with no further problems. Angelina did the same, with a successful triple activation and 3 x Lope actions, as no beasts were in range & LOS to object. The two surviving Hounds, one looking to each adventurer, also made it.


Angelina and Lara have gotten away with 5/7 Artefacts, for the loss of 1/3 adventurers and 3/5 Hounds (unfortunately a contingency roll showed Angelina’s wounded Hound also died shortly after). But on the bright side, less Goons (oops - Hounds) to be paid. It’s a solid win for the TLAC.

And now for a treetop-hugging helicopter to Bogotá, then a private jet to the Caymans. Back to the real world again!

Cheers from Pattaya
Mark