Friday 31 March 2023

Wargaming Naumachia?


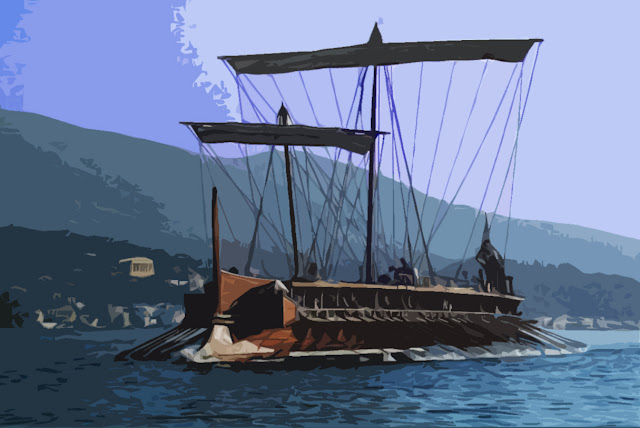
Playing out ancient naval warfare (ναυμαχία or naumachía in Greek) on the tabletop is a tricky biscuit (if ever there was such a thing…?). It is a niche within a niche; naval wargaming has always attracted a smaller crowd than land battles, and among naval players the Age of Sail and 20th century gaming are the most popular theatres.

Why the lack of engagement with naval warfare from the ancient period (and here I speak of the ancient Mediterranean in particular)? I’m not sure there is a single answer, but I’ll posit a couple of suggestions. The 20th century is within living memory (some of us were even born in the late 1900s!) and the engagements of WWI and WWII are firmly entrenched in our collective memory – at least in the West. While the Age of Sail (and here I mean the broad sweep of the 16th-19th centuries) is slightly more distant, it heralds romantic notions of swashbucklers and empire builders. This is especially the case in the Anglophone world where the cultural psyche has been fine-tuned by (often apocryphal) tales of plucky England taking on the bigger boys and getting away with the prize. It has an enduring appeal and sure, didn’t I publish Galleys & Galleons for that precise reason.

Roman squadron on patrol (1/1200 scale from Langton)

But what about ancient naval warfare? To an extent naval warfare suffers from the same biases in the written evidence that effects ancient land wars. The written sources tell us about the big ones, your battles of Salamis, Arginusae, Mylae and Actium. These battles pitched hundreds of ships, mostly very similar in form, against each other with only the scantiest accounts of the strategems involved. Trying to replicate that on a tabletop is not a hugely attractive prospect for most. Lines of ships approach each other, dice are rolled, and one lot sink or flee. There is no rock-scissors-paper interchange between say heavy infantry, cavalry, and missile troops on land.

Merchant freighters (1/1200 scale from Langton)

Furthermore, the names are all a bit strange, and not overly consistent. One man’s triērēs is another man’s trireme. With their banks of oars and bronze rams, the war galleys all look a bit alike, and certainly the overall aim – to sink or capture ethe enemy – can make the tactics a bit monochrome.

However (and it is a big however), what we don’t hear so much about are the smaller engagements – the raids and patrols, piracy and escort duties. It is these smaller engagements of anywhere up to a dozen vessels a side that have the greatest potential to make for exciting naumachia. 

An ambush underway (1/600 scale from Xyston)

At this scale you can explore the variable quality and capabilities of distinct vessels, as well as the different maritime traditions of the main protagonists. Here you can play with different notions of ramming, boarding, shearing oars, missile fire and artillery. You can also make the distinction between wargalleys and merchant freighters or transports. Without getting bogged down on whether your archers are stationed in the bow or the stern, at this level, you might even find that late in the season a ship’s timbers become fouled or waterlogged, or that a crew is depleted from disease or simple attrition.

Juicy mechant vessels on the watch for pirates (1/600 scale from Xyston)

The challenge then, is to make an engaging game specifically representing ancient naval warfare. To reflect simultaneous activity, there needs to be unpredictability in the turn-order, and movement must be dictated as much by momentum as by choice. Each vessel needs to be able to monitor the resolve of its deck-fighting crew, the capacity of its oarsmen, and the strength of its hull. But if this is one of my games, we need to have a touch of uncontrolled chaos, and a streamlined approach to combat to keep all player engrossed in the flow of battle and the tides of war. Yes, I rather like the sound of that.

Horses for courses - a hemiola and two tetrērēs (1/600 scale from Xyston)

In the meantime, for anyone looking for a bit of background, there are various academic books and articles out there, as well as a couple of good novelisations of ancient mariners. I’ll list a few below, but if you have any recommendations, do please add them as a comment below!

Background reading
  • Morrison, Coates and Rankov, The Athanian Trireme: The history and reconstruction of an ancient Greek warship (2nd ed. 2000).
  • Grainger, Hellenistic and Roman Naval Wars 336-31 BC (2011).
  • De Souza, Piracy in the Graeco-Roman World (1999).

Novels
The Mandrocles series by Nick Brown follows a Samian marine in Athenian service during the early 5th century BC. So far there are three in the series, but it is crying out for more.
  • Luck Bringer (2013)
  • The Wooden Walls of Thermopylae (2014)
  • Athens is Burning (2022)

The Sun’s Bride, by Gillian Bradshaw (2008) focuses on the helmsman of a Rhodian pirate-hunter in the 3rd century BC.


Saturday 18 March 2023

A Tale of Burrows & Badgers - a learning game of poor rolls and worse decisions

Andrew and I, supported by Jim as an impartial drinking companion, met for learning game of Burrows & Badgers on St Patrick's Day. As this was our first play through of B&B, we decided not to start a campaign, but just to run through the mechanics using my rogues vs Andrew's royalists.

The two warbands played quite differently; at least at the start before I forgot to play to my strengths and just made a beeline for the developing scrum in the middle of the village. I tried a couple of ambushes - one working and one being foiled by an overly aware badger. Shooting from the mouse-archers on either side was quite effective, while my otter leader with the quick shot skill failed to do very much at all.

We discovered that Andrew's mouse nun (read: magic user) was a very effective support unit, salving his big hairy beaver after the pounding it took. On the other hand, my badger healer was much less effective as a result of marching his right up to join the melee in the middle. At the end of the day, the only two takedowns in the game were my otter leader and polecat second - both falling victim the berserk beaver with the two-handed maul.

Even with repeat page-flicking to confirm half remembered rules, we set up, drank, played around, made repeated improper comments about Andrew's big hairy beaver, and then chatted through the game, all in the space of a couple of hours. It was all pretty stright forward, great fun, and very full of character. This is definitely a game we will be playing in its full campaign form in the near future - just with a slightly different starting line-up for my rogues... and new dice. 

Sunday 12 March 2023

Galleys & Galleons: the price of Trepang

Another dispatch from the antipodes as Mark returns to his Galley's & Galleons narrative campaign:

The price of dried trepang has shot up to unprecedented levels on the Canton Futures Market. It’s worth twice its weight in silver taels. Clearly this is no longer a resource that can be left for the local primitives to exploit. The Ming court orders An-te Hai (Admiral of the Tribute-Bearing Fleets) to intervene in strength to ensure Chinese control of the supply chain. Don Marco da Pattaya (Captain-General of the Indies) likewise decides to place the fishery under Portuguese protection. No-one knows what the Makassans and other traditional harvesters think about this.

The two squadrons met in the Arafura Sea off the northern coast of Australia, the most productive source of trepang.

The Ming Chinese (348) bring -
4 x War junks (3x42, 1 x72*)
(Hakka Merchant*, Conch Shell, Green Eyebrows, Lucky Breeze)
Q3 C3: Drilled soldiers, Flagship*, Lateen rigged, Reinforced hull
3 x Pirate (Wako) allied junks (Bean Sprout, Bitter Melon, Bok Choy) (3x50)
Q2 C2: Derring do, Intimidating, Lateen rigged, Reinforced hull, Yare

The Portuguese (356) bring -
1 x Galleon (Sa Caterina da Goa) (106)
Q3 C4: Chaser guns, Drilled soldiers, Flagship, Galleon rigged, Master gunner, Trained gun crews
3 x Fragatas (Sa Barbara, Sao Jorge, Sao Martinho) (60x3)
Q3 C3: Chaser guns, Galleon rigged, Master gunner, Trained gun crews
1 x Dragao (Dragao) (70)
Q3 C2: Airship, Bombs, Fiery attack, Lateen rigged, Master gunner

Apart from the Dragao (which can be towed by a surface ship) there are no high-tech vessels such as Submersible rams (too far from base for such unreliable contraptions) or very large ones such as Galeasses (too difficult logistically + they would slow down the rest of the squadron).

Both commanders are swaggering captains ! 

I used a set of contingent rolls to determine the game set up. The starting options were: (1) both sides enter from the same long table edge; (2) they enter from opposite edges; (3) one side is anchored near an island in the table centre. Naturally in accordance with Sods Law the least likely option (1) turned up. Further rolls determined that both squadrons will come in from the N, that the wind will initially be from the NW, and the Chinese will have the weather gauge and initiative.

*****

So here we are as An-te Hai and Don Marco’s squadrons sail onto the table, having sighted each other at first light a couple of hours earlier. 


On turn 2 An-te Hai held his course, possibly to maintain his position to windward for as long as possible. His plan is to choose the right moment to swarm the Portuguese and capture them by boarding. The Ming squadron has quite respectable artillery, but lacks the shooting expertise of the Long Noses.


Don Marco altered course to starboard, parallel to the enemy. They’ll have to turn to port eventually and his plan is to get a bit closer, shake out his formation to bring all his guns to bear, then blast the Ming to smithereens at long range.

On turn 4 the Ming squadron turned to port (from broad reaching to running thus slowing from L to S movement). The junks Bitter Melon and Bok Choy opened fire at the Santa Barbara, but their shooting was wild. The Portuguese held their course, now converging on both the enemy and the Experiment Isles.


Turn 5, and both commanders are getting a bit worried about their tactical positions. An-te Hai turns another 2 points to port, now heading directly for the islands and also on track to cross in front of the oncoming Portuguese. Except for the Conch Shell which fails to read the signal and holds the previous course. The pirate junks continue shooting at the closest fragata but are wasting their powder.

Don Marco detaches the Santa Barbara to harry the Ming from their rear, and the fragata hauls its wind and begins a turn to starboard, to  swing behind the enemy and join the Dragao. It shot at the pirate junk Bitter Melon with its chaser guns, but its shooting was no better than the Ming efforts. The rest of the squadron holds course for a bit longer, but the Sa Caterina (Don Marco’s flagship) spills wind, slowing down to allow the other fragatas to pull ahead.


Turn 6, An-te Hai likewise divides his squadron. The pirate junks use their Yare ability to spin around and head for the Santa Barbara. Had the Bitter Melon not failed on one activation dice, it would have been able to contact the fragata.  The larger Ming war junks, belatedly joined by the Conch Shell, hold their courses.

The Sa Barbara turned to starboard (now close hauled), spilled wind to slow down, and fired a raking full broadside at (just barely) short range into the approaching Bean Sprout. Causing 2 damage including a critical hull hit. Dragao then chipped in with a fiery attack on the same target, sinking the unlucky pirates.

Sao Martinho and Sao Jorge both opened fire at the Boy Choy, no effect. Santa Caterina fell off the wind, and sent a full broadside into the Bitter Melon, no effect. 


Turn 7, and the Ming stepped up their attack. The large junks turned further to port and closed with the Portuguese. Green Eyebrows took the lead, shooting at the Sa Caterina, and Lucky Breeze shot at Dragao, but the Chinese gunnery continued to be off. 

Both the Pirate junks attacked the Sa Caterina. Bitter Melon made contact, grappled, and swarmed up the sides of Don Marco’s flagship, gaining a lodgement (won the first round of the boarding fight). Boy Choy should be able to join the fight next turn.

But the Portuguese weren’t going to take this lying down. Don Marco got off his Ottoman (make of that what you will) and led the counterattack. The Sa Caterina rolled 3 activations, and Don Marco and his crew won 3 successive boarding actions, driving the pirates back and capturing the Bitter Melon. 

Sa Barbara unleaded a full broadside at close range at the Hakka Merchant (An-te Hai’s flagship) causing 1 damage and hitting the Captain. Luckily this turned out to be the captain of the ship, not An-te Hai. Sao Martinho fired as it crossed the bow of the Green Eye rows, but lacked AP to make this a full broadside, and inflicted only 1 damage before having to alter course to avoid the islands. Behind it came the Sao Jorge, also shooting at the luckless Green Eyebrows, causing a second damage point.


So at the end of turn 7 (photo above) the Ming have lost 2/3 Pirate junks (1 sunk, 1 captured) and their large junks have 3 damage between them. The Portuguese havn’t lost any ships yet, though the big galleon (Sa Caterina) has taken 1 damage in the boarding fight and is still grappled to its erstwhile attacker Bitter Melon.

Turn 8. All the Portuguese fragatas are out of position, unable to support their flagship, and all the Ming ships are in positions to run towards it …

Bok Choy attacks Sa Caterina, grappling and boarding. But the attack is a failure, as Don Marco and the crew, unafraid of the derring-do of the pirates, defend vigorously and inflict 2 damage on the Bok Choy. And the ongoing boarding action prevents the larger Ming junks from shooting at the galleon. Green Eyebrows manoeuvres to attack Sao Jorge instead, but misses. Lucky Breeze takes a shot at Sa Barbara, and damages the fragata. Well done that Mandarin!

The Portuguese fight back. Don Marco and the Sa Caterina crew complete the defeat of the hapless Bok Choy, and cut the grapples of both Pirate junks, leaving them with prize crews aboard. I removed the “damage” caused to the captured junks, assuming it was mostly to rigging etc and can be fixed, if necessary after the battle with repair parties from the Portuguese ships. The Sa Caterina will keep her single damage point though, because why not.


At this point I called the game a win for Don Marco and the Portuguese. An-te Hai has lost all his allied Pirate junks. The war junk Green Eyebrows is badly damaged and, with 2 fragatas nearby, and hemmed in by an island, won’t ever see Canton again. His flagship Hakka Merchant is also damaged, and has lost its captain, but it and the 2 undamaged war junks can probably escape if they run for it immediately. On the bright side, the total loss of the pirates will make them an excellent scapegoat, especially as they are sponsored by a rival faction at the Ming Court.


Don Marco will send the two captured junks back to Malacca, escorted by the damaged fragata Sa Barbara. The rest of the squadron will now search for the trepang fishing fleet and persuade it to bring the catch in to Portuguese controlled ports for sale to the usual middlemen. There is no question at all of Don Marco taking a large bribe to allow continued business as usual.

Cheers from Pattaya
Mark

Friday 10 March 2023

Burrows & Badgers: The Dirty Paws (part 2)

Finishing my dirty-pawed side quest into Burrows & Badgers, I now have the maximum ten members for my warband of furry rogues ready for a campaign. I wasn't planning on painting more than a starter warband just yet, but then things escalated...

Here are the five newest members of the line up - this photo was supposed to be the header for this post, but I just couldn't get my phone to focus on everyone at once. The five original miniatures painted for the warband can be seen HERE.

Robyn Longtooth, the fox

Knut Twitchtail, the squirrel

Edwin Lightweight, the happy stoat

Dafydd mab Petroc, the mouse

Seren Pipistrelle, the bat