Sunday 31 December 2023

ProjectSeleukid - Dahai and slingers


The last post of the 2023 brings Andrew's Project Seleukid progress up to date with four bases of Dahai horse archers and four bases of generic slingers - all are Victrix. I've now a lot of catching up to do, but will be starting on my phalanx in the new year!

So bidding fairwell to 2023 and wishing everyone a happy new year! See you on the otherside. 😉

Saturday 30 December 2023

The Portuguese invasion of Madagascar 1551-1554: a G&G & HoTT campaign

Here is the last epic dispatch of the year sent through from Mark. 

The Portuguese invasion of Madagascar is an obscure facet of the contest for control of East Africa and the Indian Ocean, waged between the Portuguese and the Ottoman Turks for much of the C16. The Turks got involved to support their co-religionists as Islam gained influence in E Africa and SEA, and because the Portuguese strategy to strangle the old Spice Routes from India was a significant economic threat. There are some videos about the wider conflict (but not the Madagascar affair, oddly) on the Kings & Generals YouTube channel. You could start here if interested - https://youtu.be/R3E1SYBgK4w

The surviving archives of both sides are silent about the strategy and details of the Madagascan conflict. Fortunately a Venetian observer got himself attached to the expedition, and his relationes, in the Venetian State Archives, give some information. He was Sebastian Vernier, later commander of the Venetian squadron at Lepanto (1571), and Doge of Venice (1576-77). Here is his Lepanto portrait by Tintoretto -


BTW it is more than likely Vernier’s participation was arranged through the influence at Sagres of his distant relative Don Marco da Pattaya (who regrettably played no other role in the conflict, at least that we know of).

A Portuguese squadron commanded by Don Jose Nunes da Fonseca, escorting an expeditionary land force led by Don Miguel Forgaz, Count of Ferra, sailed into the natural harbour of Antsiranana Bay at the N tip of Madagascar, some time in December 1551. Their objectives were to destroy the Ottoman fleet believed to be based there, and capture and garrison any land fortifications they may have constructed.

More by good luck than anything, Fonseca achieved complete surprise. Ottoman naval forces were scanty and unprepared to face the Portuguese, and land fortifications were still under construction. Despite these handicaps the Ottomans, commanded by Dragut Bey, were determined to make the infidels pay dearly for their impudent attack. The name of the Ottoman naval commander has not been preserved.

As far as we can tell the forces available to each side were as follows -

Portuguese (G&G total 351)
3 x Fragatas (Sa Barbara, Sao Jorge*, Sao Martinho) (210)
Q3 C3: Chaser guns, * Flagship (Don Jose is a “middling” commander), Galleon rigged, Master Gunner, Trained gun crews
3 x Carracks (Sa Isabella, Banda Aceh, Hat Yai) (141)
Q4 C5: Drilled soldiers**, High Castles, Reinforced hull, Sluggish, Square rigged

Landing force ** (HoTT total 24 AP)
1 x HrG (Don Miguel Forgaz & entourage)
4 x Bd (sword & buckler men, halberdiers)
4 x Sh (arquebusiers & crossbowmen)
2 x Bd (mercenary samurai)

Ottomans (G&G total 174)
3 x Dhows (Djibouti, Socotra, Zanzibar) (78)
Q3 C2: Lateen rigged, Shallow draft
2 x Galleys (Srivijaya, Songkhla) (96)
Q3 C3: Drilled soldiers, Galleys, Swashbucklers, Yare

Land forces (HoTT total 24AP)
1 x HrG (Dragut Bey & entourage)
4 x Sh (Arab arquebusiers)
4 x Wb (Arab warriors)
2 x Rd (Ottoman Sipahi cavalry)

Wednesday 20 December 2023

ProjectSeleukid - agema, camelry and the end of year round-up

My final unit/s of 2023 for Project Seleukid are four companies of Arab camelry. These are Perry Mahdist camel riders with a couple of head-swaps and added bow-cases. They are lovely sculpts, but I do worry about how delicate some of the ankles are on those camels.

Antiochos fielded an undisclosed number of Arabs fighting from camel-back at the battle of Magnesia. Both Appian and Livy give limited details about these forces; they were specified as archers who also carried a long sword for melee. Their position in the battle, screening the left wing suggests that they served as mounted skirmishers and that the sword was intended as a worst-case-scenario tool rather than part of their principal kit.
 
Neither Livy nor Appian mention whether the camelry also wore armour. According to Herodotus, the Arabian camelry who fought during the Greco-Persian wars were armoured (and possibly armed) in the same manner as their infantry archers; this means that they wore a long, thick robe with a girdle. However, the Roman period sculptural representations from Dura-Europos show a Palmyrene camelryman wearing a cuirass, trousers, and either a knee-length boot or an ankle boot and greaves. The Dura rider carries a small round shield and a quiver.

The Perry camelry carry spears, long swords and round, camel-hide shields but shouldn't be too far off the mark. The gorytos bow cases are spares from the Victrix Persian infantry kit and are (hopefully) not unreasonable.

The last of Andrew's heavy cavalry for our Magnesia line-up are the Agema. They were one of two elite Seleukid cavalry units, each 1,000 strong, who appear to have served alternatively or together as the king's bodyguard. The agema were initially drawn from the best Iranian horsemen in the kingdom and were thus composed at Magnesia. However, after the loss of Media in the 140s BC, the Agema seem to have been recruited from the city of Larissa in Syria, a colony settled by Thessalians a century and a half before. The other unit, whom I will be building next year, were the Royal Companion cavalry, drawn from the best horsemen of Greco-Macedonian descent in the kingdom.
 
He has also completed another two bases of eastern archers, bringing his total to four companies.

Andrew's tally for the project so far, 118 infantry, 41 cavalry and 2 elephants. He has gone above and beyond the requirements for the Magnesia order of battle, but still needs three units of skirmishers (or 18 more foot), and two units of light horse (8 mounted).

Meanwhile, I am up to 68 infantry and 8 camelry, with 57 infantry, 28 cavalry, an elephant and two scythed chariots to go. Not such a strong showing, but then Andrew is just showing off... :)


Sunday 10 December 2023

New recruits for the Bedtime's Children

Taking a quick detour back to the wasteland, I have added three more warriors to the Bedtime's Children, my growing tribal warband for This is Not a Test. All three are slightly large 28mm miniatures from Hasslefree. At this point I am running out of strictly onesie-wearing options, so have relented to allow models with alternative evening attire. 

Sam is a sinewy chap with Y-fronts and a fireman fetish. He also has a handy fire axe which will help.

Raz keeps it real with a relaxed style in her unicorn onesie, slippers and massive tool.

Kitty, however, has other nocturnal pursuits in mind when she dons her evening wear.

The tribe now has 12 members and three warbeasts. If I see any other suitable recruits I'll pick them up, but what I'm really after now is some sort of animatronic bear to serve as a depend-o-bot.

Saturday 9 December 2023

ProjectSeleukid - Thureophoroi


Not content to let me try an catch up with Project Seleukid, Andrew has only gone and painted up some thureophoroi of his own! These are Aventine and simply beautiful figures.

Monday 4 December 2023

ProjectSeleukid - Kappadokian thureophoroi

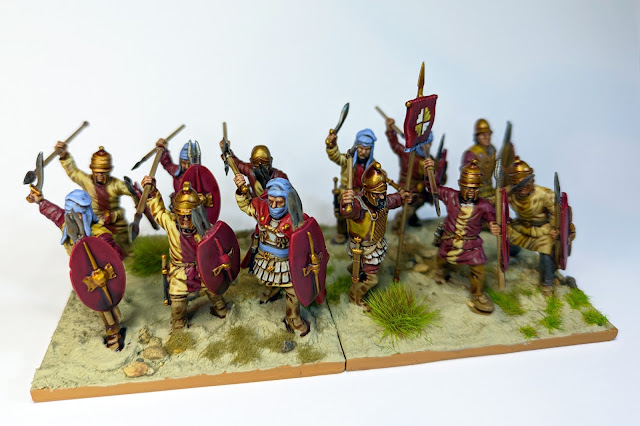
The next unit for my Seleukid army comes in the form of a small unit of Kappakokian thureophoroi. Ariarathes IV, king of Kappadokia and son-in-law of Antiochos III, sent 2,000 Kappadokian foot to aid the Seleukid cause in the run-up to Magnesia. Appian and Livy both place them on the left flank where they are said to have been equipped in the same way as the Galatians. I have taken this to mean that they were equipped with large thureoi - said to have been adopted by Hellenistic states after their contact with Galatians in the 280s and 270s BC.

The coins of the earlier Kappadokian kings (including Ariarathes III above) show the kings wearing the Iranian bashlyk, a legacy of the Achaemenid empire.

However, from the reign of Ariarathes IV (above), the portraiture conforms wholly to Hellenised norms, showing the king as a diademed Greek-style ruler - a format that was to continue until the end of Kappadokian autonomy in the first century AD.

For the unit, therefore, I have combined Hellenistic helmets with a few bashlyks mixed in, and a real mix of weapons, spears, javelins, swords and axes along with the thureoi. Here, next to the Phrygian thureophoroi, the units look quite distinct despite both being made from the Victrix Achaemenid spearmen kit. 

Sunday 3 December 2023

Don Marco da Pattaya counterattacks at Kupang, parts 3 & 4

Part 3. The siege of Kupang fortress

A couple of weeks have passed since the Lasiang landing and battle. Instead of following up the defeated Songkhla defenders at once, the Portuguese have completed a palisaded base and moved in the supplies necessary to support the army. Now it’s all done and Don Cristobel Da Crespo has left a small garrison and led his men to the fortress of Kupang. 

A contingent of Timorese natives has joined the expedition, led by the missionaries. 

The remaining Songkhka garrison has withdrawn into the fortress. Since it was captured over three years ago nothing much has been done to repair the damage, except a hastily-built and incomplete palisade in front of the breach. The Portuguese had been counting on this, it’s why they havn’t brought up siege artillery.

As Don Cristobel is making his dispositions, a message arrives from Don Marco: the Sultan of Songkhka has sent a large relief force, and it has been sighted at Utara Pulau, to the SW. He’s going to wait for it at Hatong Point, which it must pass to reach Kupang.

Don Cristobel decides to assault the fortress rather than passively besiege it to starve out the defenders. If he can capture it he’ll be in a better position should the worst happen and Don Marco be defeated at sea.

The Portuguese have 32AP to assault and capture the fortress -
1 x HrG (Don Cristobel da Crespo & staff)
5 x Bd (Sword & buckler men)
4 x Sh (Arquebusiers  & crossbowmen)
6 x Hd (Timorese native auxiliaries)
1 x Pd (Inspirational missionary leader of Timorese)

The Kupang defenders have only 20AP following their heavy losses at Lasiang - 
1 x BdG (Somsak Prapanimit & staff)
4 x Sp (Songkhla regular infantry)
2 x Bd (Mercenary samurai)
2 x Sh (Arquebusiers & bowmen)
+ field defences & positional advantage

*************

Here’s a view of the opening positions. Don Cristobel is naturally attacking at the place where the fortress wall was breached three years ago by siege artillery. The defenders have covered the actual gap with a palisade but adjacent heavily damaged sections of the bastion have not been repaired.


The Portuguese advanced on a wide front so as to attack all along the wall and try to over-stretch the defenders. It took a while to get all the attacking elements into position. No doubt the PIP shortage reflects some hesitation about the risks of the forthcoming attack. 

On turn 6 the first wave of attacks goes in. The defenders get +2 (to combat and shooting) when actually defending the line of the walls. The attackers can use 2 PIPs per element to use scaling ladders to offset the defenders’ advantage by +1. Also any recoil of an enemy element defending the walls may optionally be followed up.

In the centre the Japanese mercenaries threw back the Timorese assault on the palisade. But on the L one element of Portuguese forced the defending Sp back from the wall and followed them up. They didn’t use scaling ladders but clambered over the ruins of the wall and then got a really favourable combat roll.


But on the next turn the attackers who had got over the wall were pushed back out by the defending Sp, and the Timorese, renewing their attack on the palisade, received their first loss. 

Action then switched to the R end of the attack. The Portuguese finally rolled enough PIPs to get two Bd  elements over the wall at an undefended section using ladders. The nearest defending element (Sh) attacked but it was a drawn combat. 


The Portuguese escalade on the R gained momentum as another element (Sh) got over using a ladder, and the Bd already across defeated the defenders opposing them, destroying a defending Sh and recoiling the Sp. Over on the L the Portuguese Bd again broke through. The valiant Timorese kept up their attack on the palisade but succeeded only in losing another element.


The defenders are under heavy pressure now as Don Cristobel’s “broad front” tactic seems to be working. They desperately need sone better PIPs, and combat luck, to throw back the attackers. 

It’s turn 9 now - as far as I can tell, lost track a bit - and the defenders got 6 PIPs. 

On the L the defenders pull extra elements from either side to overlap and friction attack the Portuguese Bd who have broken through. They don’t get the wall bonus because the defending Sp have been recoiled from the wall … and the Portuguese win the combat.


On the R the defenders move up their BdG (Somsak) but he cannot get into combat contact this time. They move their only other elements over here into line, to avoid losing the rear one to an uncompletable recoil … and indeed the Portuguese win this fight too …


… and then go on to roll 5 PIPs for their own bound, using them to reinforce their existing breakthroughs. On the L the defenders prevent any further Portuguese success, but in the R a defender Sp falls to a friction attack. In the C the Timorese have paused their assaults on the palisade, and one of the Samurai Bd has been diverted to help contain the Portuguese threat on the L.

After 9 turns the progress score is 2-4 Portugal. Both their losses are Hd. The Defenders are down by 1 x Sh & 1 x Sp.

Turn 10, and the defenders get another 6 PIPs. BdG Somsak attacks the Portuguese Sh who have scaled the wall to the R of the palisade, and destroys them. The second Samurai Bd comes up in support, leaving the palisade undefended. There’s only 1 other defending element on the R - a Sp company - and it goes down to a Portuguese Bd with a horrible combat roll. Over on the L the defenders again try an overlap + friction counterattack, and again fail as the Portuguese Bd recoils it. 


The Portuguese use their meagre PIPs this bound to make an overlap attack on the defending BdG. It’s a drawn combat.

Turn 11. This time the defenders have ony 1 PIP. The second Samurai Bd comes to help Somsak, but both defending Bd are recoiled by the Portuguese Bd. Then the Portuguese get 6 PIPs and use them to get 2 x Hd over the palisade on ladders. And in the Bd fight nearby the samurai are recoiled again but Somsak and his entourage stand their ground.

Turn 12. The defenders throw everything at the Portuguese breakthrough on the L. Another overlap + friction attack. And this time it works. The Portuguese Bd element that has clambered through the gap in the wall is destroyed. On the R Somsak is overlapped by two Portuguese Bd, and again fights them to a standstill.


The Portuguese get another ration of 6 PIPs. Right-o, thinks Don Cristobel, time for the final push. On the L the attack is not renewed. But in the C the two Timorese Hd who got over the palisade last time move into the rears of the two defending Bd (Somsak himself, and the Samurai) who are also attacked from the front by the Portuguese Bd. Lastly Don Cristobel himself, and the Missionary Pd, prepare to escalade the walls next turn.

Somsak Prapanimit the defending BdG falls in combat, as does the adjacent Samurai Bd. 


The scores tick over to 10G-6 Portugal. So that’s a Portuguese win. 
 Don Cristobel has taken back the fortress of Kupang at a cost of 1 x Sh, 1 x Bd, 2 x Hd elements. The Songkhla defenders lost 1 x BdG, 1 x Bd, 2 x Sp, 1 x Sh.

The surviving defenders will mostly be taken prisoner, though no doubt some will escape on fishing boats from the harbour below the fortress. That helps solve the problem of where the forced labour will come from, to move up the supply dump from Lasiang, and start the job of rebuilding the fortress, now back in Portuguese hands.

That only leaves the question of what is happening out at Hatong Point. All Don Cristobel and his men can do about that is cross their fingers and hope. While getting on with the looting of course.

Part 4. The battle of Hatong Strait

Don Marco ordered his squadron to sail SW, to Hatong Point, at the entrance to the strait the enemy would have to pass through to reach Kupang.

His ships were much the same as at the battle of Cape Solamoe, except that the transports no longer counted drilled soldiers, these being with Don Cristobel da Crespo at the siege of Kupang. And with the addition of Moscato, which had brought the intelligence of the Songkhka squadron. Total = 379 points.

1 x Galleon (Santa Caterina da Goa) (106)
Q3 C4: Chaser guns, Drilled soldiers, Flagship*, Galleon rigged, Master gunner, Trained gun crew [* Don Marco is a Middling commander, he says he has a headache today]
3 x Fragatas (Sa Barbara, Sao Jorge, Sao Martinho) (60 x 3)
Q3 C3: Chaser guns, Galleon rigged, Master gunner, Trained gun crews
1 x Carrack (Sa Isabella das Indias) (35)
Q4 C5: High castles, Merchantman, Reinforced hull, Sluggish, Square rigged
2 x Requisitioned merchant junks (Ginger Jar, Hainan Trader) 20 x 2)
Q4 C3: Merchantman, Reinforced hull, Square rigged
1 x Merchant brig (Moscato [Nutmeg]) (18)
Q3 C2: Lateen rigged, Master gunner, Merchantman

The Songkhla squadron (410 points) was commanded by Muezzinzade Ali Pasha, and comprised -

2 x Galeasses (Hat Yai*) (72), (Banda Aceh) (50)
Q4 C5: Bow guns, Drilled soldiers, Flagship*, High castles, Square rigged, Sluggish, Sweeps, Veteran NCOs [* Muezzinzade Ali Pasha is a Swaggering commander]
4 x Songkhla galleys (Ayutthaya, Borobudur, Songkhla, Srivijaya) (48 x 4)
Q3 C3: Drilled soldiers, Galley, Swashbucklers, Yare
2 x Knights of St Michael galleys (Corona, Stella Artois) (48 x 2)
Q3 C3: Drilled soldiers, Galley, Swashbucklers, Yare
The Knights are reluctant allies of Songkhka, and not fully trusted. 

*************

As Don Marco had foreseen the two squadrons met in the Hatong Strait. The wind was steady from the West.

After 3 turns we see the Portuguese coming on from the N in columns, and the Songkhla squadron in textbook galley linear formation with the galeasses out in front.


On turn 4 the fragata Sao Jorge tried a ranging shot (full broadside at 2L) on the galeass Banda Aceh, but no hits were observed. Most of the galleys have fallen behind now, as the galeasses lumbered ahead (came off the wind slightly to increase speed) while the galleys ended up on the wrong side of an early turnover.


Turn 5 started well for Songkhla as the Banda Aceh closed the Sa Barbara and fired its huge bow guns at point blank range, inflicting 1 damage point and wounding the captain. Most of the galleys bent to their oars and rushed towards the action, but those on the R of the line, and the other galeass, were stranded by turnover except for a 1S sailing move by the Hat Yai.


Fortunately for the Sa Barbara it had a competent 1st Lieutenant. So the ship altered course to starboard so as to slide past the bow of the Banda Aceh, and sailed past, delivering a full broadside into the clumsy giant as it went. The shots bounced off the hull.

The Sao Jorge came up and fired at the galley Ayutthaya, inflicting 1 damage, and the Sa Caterina began to pass between the two galeasses, inflicting 1 damage on Banda Aceh. The Portuguese merchants continued their slow movement forward (square riggers, close hauled).


Turn 6. The Songkhla galleys engaged the enemy more closely. In shooting, the galley Ayutthaya inflicted 1 damage on the frigate Sao Jorge. The Borobudur grappled and boarded the Sa Barbara over the bows, a wave of swashbucklers taking the small frigate to 3 damage total. The galley Songkhla tried to board the galleon Sa Caterina (Don Marco’s flagship) but failed to gain a foothold as the fight was a draw.


The Red markers show damage points. I’m about to run out of Red, so will substitute 3 Red (crippled) by 1 Green. The Yellow markers show grappled ships, with boarding actions under way in both cases. Blue marks captured ships.

In the Portuguese bound the Sa Barbara struck to the Borobudur (Blue marker). The fight between the Sa Caterina and Songkhla continued, each vessel now has 1 damage apiece. The frigates Sao Jorge and Sao Martinho poured fire into the galleys Ayutthaya (crippled, rudder stuck) and Corona (1 damage).


Turn 7. Sa Caterina is now being boarded by the galley Songkhla and the galeass Banda Aceh. Action was desperate with multiple rounds initiated by each attacker. At the end of the bound Sa Caterina has 3 damage and the attacking vessels have two each. Then the flagship galeass Hat Yai activated, and rolled tuatara eyes. It sailed slowly into contact with Sa Caterina but can do no more. The other not-yet-activated Songkhla vessels are also all rendered helpless by this.

Naturally the Portuguese seized this potential get-out-of-jail card with both hands. The Sao Jorge sank the crippled Ayutthaya, and the Sao Martinho crippled the Corona. The Sa Caterina decided not to use its two activations, so all sides in the boarding fight paused to regroup.


Turn 8. This time the Hat Yai grappled and boarded the Sa Caterina, but this failed and the Hat Yai took 1 damage. The Songkhla then resumed the boarding fight, but it also lost and went to crippled status. The Banda Aceh then stepped up. It also lost, and also goes to crippled status. I don’t know what they’re drinking on the Sa Caterina, but I want some. On the R the laggard galleys finally move up to engage the slowly-approaching Portuguese merchants. On the L the surviving galleys took evasive action.

The Portuguese carrack Sa Isabella finally gets into action, contacting and grappling the galley Srivijaya. No AP to board this bound though. The merchant junk Ginger Jar grapples and boards the galley Stella Artois (which had contacted the GJ last bound). The Ginger Jar takes 1 damage. Elsewhere the Hat Yai finally overwhelms the last defenders of the Sa Caterina, capturing the Portuguese flagship. Portuguese shooting from the frigates and brig is a failure.


Turn 9. Srivijaya boards the Sa Isabella, fighting multiple rounds. After the blood has been mopped up the carrack has taken 1 damage and the galley has 2. The boarding fight between Stella Artois and Ginger Jar goes two rounds in this bound, with the score 1-1 (so GJ now has 2 damage and SA has 1). Over on the L the Borobudur gets ready to engage the frigates, while the crippled Corona, failing an All at Sea roll, turns hard to starboard and rows into the distance. In the centre the melee around the Sa Caterina starts to untangle. The Hat Yai reels in its grapples and uses sweeps to move back. Songkhla and Banda Aceh do likewise, both successfully activating while crippled.

The Portuguese frigates take the Borobudur to 2 damage. Sa Isabella goes two boarding rounds with Srivijaya, inflicting another damage (Srivijaya is now crippled). Hainan Trader contacts Stella Artois but cannot grapple the galley. Ginger Jar continues the fight, but loses again and is now crippled.


Here’s a summary of after 9 turns.

The Portuguese have lost the galleon Santa Caterina (Don Marco’s flagship) and the fragata Santa Barbara, both captured by the enemy. Total 2/8 ships and 166/379 points (44%). They also have the merchant junk Ginger Jar crippled and probably about to be captured which would take them to 3/8 and 49% losses.

Songkhka have lost 1 galley sunk (Ayutthaya) and 1 captured (Srivijaya) . Total 96/410 points (23%). But they also have several crippled ships: Banda Aceh, Corona, Sangkhka, totalling another 36%, or 5/8 & 59%.

Counting ships that are intact or have no more than 1 damage (so capable of effective ongoing action) the Portuguese have 2 frigates, 1 merchant brig, 1 carrack, 1 merchant junk (5/8 ships, 193/379 = 51%. Songkhla has I galeass (flagship), 1 galley (2/8 ships, 120/410 = 29%).

Takeaway: it’s been a bloodbath but the Portuguese have won.

*************

I set up some contingent dice rolls to see what would happen, including one side or both breaking off, the other side giving chase, recapture of prizes, and a storm brewing. So here’s the end story. 

The Songkhla survivors broke off the action and the Portuguese let them go without pursuit. Both Portuguese ships captured by the enemy were retaken (the Sa Caterina was retaken by its own crew who broke out from below decks and overcame the prize crew). Don Marco is apparently unhurt. The Sa Caterina and Ginger Jar have only superficial damage suffered in the boarding fights, so can be operational again soon enough. But damage to the Sa Barbara was more serious.

A storm blew up overnight in which the captured galley had to be abandoned and sank, as did the frigate Sa Barbara. It’s likely at least some of the crippled Songkhla vessels -those damaged by gunfire rather than in boarding fights -  would also have sunk in the storm as they made their getaway, but this is not known.

BTW I had also built in a contingency for the galleys of the Knights to retire from the action, or change sides, if (for example) the Songkhka flagship was sunk or captured. In the event this contingency never arose. But it explains why these galleys were spread out among the Songkhla vessels, not deployed on their own.

*************

So Don Marco has succeeded recapturing the fortress of Kupang for Portugal, and defeating the attempted counter stroke by Songkhka. His stock will be higher than ever at Sagres and Goa. He instructs his Secretary to start preparing appropriate despatches, carefully minimising the contribution of Don Cristobel. And he relaxes in his stateroom, on his favourite ottoman, leafing through the latest parade armour catalogues from Augsburg and Milan. A good months work.

Cheers from Pattaya
Mark

Saturday 2 December 2023

Don Marco da Pattaya counterattacks at Kupang, parts 1 & 2

Part 1 - the battle of Cape Solamoe

You’ll all no doubt have vivid recollections of the fall of Kupang, reported by Mark back on 2020. 

Galleys & Galleons - The Siege of Kupang (part 1)
Galleys & Galleons - The Siege of Kupang (part 2)
Galleys & Galleons - The Siege of Kupang (part 3)


This Portuguese base on the NW coast of Timor was a vital part of their control of the Spice Islands. Its capture by an unholy alliance between the Sultan of Songkhla and the knights of St Michael of Singapore was a serious strategic blow to Portuguese ambitions in the East Indies.

But now they’re planning a comeback. The enemy alliance has frayed. The fortress of Kupang has never been properly restored since the siege. It is now in poor condition and ill-defended, according to intelligence reports. The indigenous population is hostile to the Songkhka occupation on religious grounds thanks to the indefatigable efforts of the Jesuit missionaries.

Don Marco sails from Malacca with an invasion squadron comprising -

1 x Galleon (Santa Caterina da Goa)
Q3 C4: Chaser guns, Drilled soldiers, Galleon rigged, Master gunner, Trained gun crew

3 x Fragatas ( Sa Barbara, Sao Jorge, Sao Martinho)
Q3 C3: Chaser guns, Galleon rigged, Master gunner, Trained gun crews

1 x Carrack (Sa Isabella das Indias)
Q4 C5: Drilled soldiers^, High castles, Merchantman, Reinforced hull, Sluggish, Square rigged

2 x Requisitioned merchant junks (Ginger Jar, Hainan Trader)
Q4 C3: Drilled soldiers^, Merchantman, Reinforced hull, Square rigged

^ Drilled soldiers on the carrack and junks are the invasion landing force.

The defenders get enough warning to decide to meet the Portuguese at sea, off Cape Solamoe, aiming to disrupt the reconquista attempt before it reaches Kupang. They have the following ships, under the command of Presha Abdul Kadir (the Mudir of Kupang) -

2 x Songkhla galleys (Srivijaya, Songkhka)
Q3 C3: Drilled soldiers, Galley, Swashbucklers, Yare

1 x Galeass (Banda Aceh)
Q4 C5: Drilled soldiers, Bow guns, High castles, Sluggish, Square rigged, Sweeps, Veteran NCOs

2 x Wako allied pirate junks (Bamboo Shoot, Bean Sprout)
Q2 C2: Derring-do, Intimidating, Lateen rigged, Reinforced hull, Yare

The defenders are outnumbered but the Portuguese are hampered by the transport ships.

*************

The two squadrons sighted each other mid-morning near the Deserted Islands, Cape Solamoe bearing due E about 3 leagues, and the wind a fresh breeze from the ENE. The Portuguese came on in two columns: the fighting ships in the windward column with Sa Caterina leading the frigates, and the transports in the leeward column. The defenders were in rough line abreast, galleys on the R and Wako on the L.

After 2 turns here’s the position. Wind direction is from top R to bottom L, so the Portuguese are broad reaching  / running and the defenders are close hauled (not the galleys obviously, which are under oars) -


And a low level view from the maintop of the Banda Aceh (with enemy Wako junks out of view to the L).


On turn 3 the Sa Caterina opened fire on the galley Srivijaya, inflicting 2 damage, but also rolling turnover. 


The Wako junks continued on course towards the Portuguese transports in the lee column, but the closer junk fired a full broadside at the Sa Caterina (but too far to count as raking fire) but the shot bounced off the big galleon. The Banda Aceh galeass (under sails) advanced but couldn't shoot. The galleys failed to move (rolled turnover) and their shooting was equally ineffective.

Turn 4. The Sa Caterina continued forward remorselessly, and poured a full broadside into the Banda Aceh at point blank range, but inflicted only 1 damage on the giant. The next in line, Sao Martinho, fired at the Srivijaya, inflicting a 3rd damage on the galley. Sao Jorge, third in the line, came abreast the galley Songkhla, and inflicted 1 damage. Over in the leeward column the two transport junks shortened sail, though the Sa Elizabeth ploughed forward.


The Wako junks stuck to the knitting, altering course slightly to port and piling on speed (close hauled to broad reaching) to close the transports. But before this, Bean Sprout used an available activation to put a raking shot into Sa Caterina from right under its bows, causing the Galleon 1 damage. The galley Songkhla closed towards the frigate Sao Jorge and also inflicted 1 damage from close range shooting. Srivijaya likewise closed to shoot at Sao Martinho but missed. Lastly, Banda Aceh got in a close range shot at Sa Caterina. The shooting was ineffective but the giant Galeass then contacted  the Galleon and grappled it. 

The next photo shows the end of turn 5. I have left a shooting smoke marker at the point where Bean Sprout raked Sa Caterina.


Turn 5. As boarding hadn’t commenced, Sa Caterina used its 2 activations to pour a raking full broadside into the Banda Aceh. The modified shooting scores were 11-3 so the Banda Aceh took 3 damage. This took her to total 4 damage, and she sank. I ruled this snapped the grapples so the Sa Caterina got to sail on. The Sao Martinho then sank the Srivijaya. The Sao Jorge took the Songkhla to 3 damage total, and the Sa Barbara, last frigate in line, came abreast of the crippled galley and sank it too.

Here’s the end of turn 5 (Portuguese bound). The Songkhla appears to be still afloat but only because I ran out of wreck markers. A remarkable demonstration of Portuguese gunnery. It’s striking what close range raking full broadsides directed by master gunners will do.


The two Wako junks will turn tail and flee now, as they know what’s good for them. They briefly considered a fast descent on one of the transport junks, but the rear frigates can change direction and be on their tails before they can fight their way on board to capture and loot it.

Don Marco surveys the scene from the quarterdeck of Sa Caterina. He twirls his mustachios, regards himself in the full-length mirror next to the binnacle, and then gives orders for the squadron to make best speed to Kupang.

Part 2 - the landing at Lasiang beach

After destroying the defending naval squadron off Cape Solamoe, the Portuguese invasion force anchored off the coast, about half a league east of Kupang, without further incident. The Council of War decided to land the troops at Lasiang, where there was a suitable sandy beach with open flat country inland, establish an onshore logistical base, before marching along the coast to Kupang.

The previous battle was fought using the Galleys & Galleons naval rules and now I’m switching to HoTT for the land action.

The invasion force comprised -

1 x HrG (Don Cristobal da Crespo and staff)
4 x Bd (Sword & Buckler men)
4 x Sh (Crossbows & Arquebusiers)
1 x Cl (representing the Church Militant)
1 x Lu (Scouting party)

As the landing was still under way the troops came under attack from part of the Kupang garrison, which had marched along the coast, comprising -

1 x HrG (Somsak Prapanimit)
2 x Rd (Mercenary Javanese cavalry)
3 x Sp (Songkhla regular infantry)
3 x Wb (Mercenary Thai warriors)
2 x Sh (Bows & Arquebusiers)

*************

First ashore were Don Cristobel and his staff, and the militant cleric & acolytes. They encountered the Kupang advance guard, a couple of mounted elements.


Over the next few turns both sides built up their strength as reinforcements arrived, from offshore or along the coast, until on turn 4 the Portuguese struck. On their R (the Kupang L) they destroyed a Kupang Sh, and on the L (Kupang R) they recoiled an Rd element. The geometry of this meant both Kupang Rd elements ended up partly within a palm grove. Although they extricated themselves before the Portuguese Lu could take advantage.


The Kupang army counterattacked, but wasn’t able to dent the Portuguese line. Then in the Portuguese bound of turn 6 things took a decisive turn, as the they brought down a Kupang Rd element, and a column of 2 x Wb. 


Progress score after 6 turns: 8-0 Portugal.

So on turn 7 the defenders launched a desperate attack, almost suicidal, committing all their remaining troops. But although Don Cristobel himself was recoiled by the Kupang Rd, and the Kupang Sp recoiled a Portuguese arquebusier element, the last Kupang Wb fell to the Portuguese Bd, as the score ticked over to 10-0 Portugal.


In their own bound the Portuguese did just enough to finish the job, destroying the remaining Kupang Rd, taking the final score to 12-0.


A convincing win for the invasion force. The Kupang survivors must flee: either back along the coast to Kupang; or into the hinterland where unfriendly locals will give them a “warm” welcome.

*************

So the landing force is safely ashore and has routed the force sent to throw it back into the sea. The necessary supplies can now be landed without interference, and a palisaded base built. Then the expedition can move to recapture the fortress of Kupang.