The Portuguese invasion of Madagascar 1551-1554: a G&G & HoTT campaign
Here is the last epic dispatch of the year sent through from Mark.
The Portuguese invasion of Madagascar is an obscure facet of the contest for control of East Africa and the Indian Ocean, waged between the Portuguese and the Ottoman Turks for much of the C16. The Turks got involved to support their co-religionists as Islam gained influence in E Africa and SEA, and because the Portuguese strategy to strangle the old Spice Routes from India was a significant economic threat. There are some videos about the wider conflict (but not the Madagascar affair, oddly) on the Kings & Generals YouTube channel. You could start here if interested - https://youtu.be/R3E1SYBgK4w
The surviving archives of both sides are silent about the strategy and details of the Madagascan conflict. Fortunately a Venetian observer got himself attached to the expedition, and his relationes, in the Venetian State Archives, give some information. He was Sebastian Vernier, later commander of the Venetian squadron at Lepanto (1571), and Doge of Venice (1576-77). Here is his Lepanto portrait by Tintoretto -

.jpg)
The Portuguese got a nasty surprise in turn 6 though, when the dhows scored hits on the Sao Jorge and Sao Martinho. But then the last dhow to activate rolled turnover, depriving the galleys of a chance to join in.


Don Miguel orders a vigorous counterattack. He and his entourage, with the samurai, lined up ready to take on the Wb. The main Bd line charged the Ottoman Sh who have ventured forward, destroying 1 and recoiling the others.


The Portuguese invasion of Madagascar is an obscure facet of the contest for control of East Africa and the Indian Ocean, waged between the Portuguese and the Ottoman Turks for much of the C16. The Turks got involved to support their co-religionists as Islam gained influence in E Africa and SEA, and because the Portuguese strategy to strangle the old Spice Routes from India was a significant economic threat. There are some videos about the wider conflict (but not the Madagascar affair, oddly) on the Kings & Generals YouTube channel. You could start here if interested - https://youtu.be/R3E1SYBgK4w
The surviving archives of both sides are silent about the strategy and details of the Madagascan conflict. Fortunately a Venetian observer got himself attached to the expedition, and his relationes, in the Venetian State Archives, give some information. He was Sebastian Vernier, later commander of the Venetian squadron at Lepanto (1571), and Doge of Venice (1576-77). Here is his Lepanto portrait by Tintoretto -

BTW it is more than likely Vernier’s participation was arranged through the influence at Sagres of his distant relative Don Marco da Pattaya (who regrettably played no other role in the conflict, at least that we know of).
A Portuguese squadron commanded by Don Jose Nunes da Fonseca, escorting an expeditionary land force led by Don Miguel Forgaz, Count of Ferra, sailed into the natural harbour of Antsiranana Bay at the N tip of Madagascar, some time in December 1551. Their objectives were to destroy the Ottoman fleet believed to be based there, and capture and garrison any land fortifications they may have constructed.
More by good luck than anything, Fonseca achieved complete surprise. Ottoman naval forces were scanty and unprepared to face the Portuguese, and land fortifications were still under construction. Despite these handicaps the Ottomans, commanded by Dragut Bey, were determined to make the infidels pay dearly for their impudent attack. The name of the Ottoman naval commander has not been preserved.
As far as we can tell the forces available to each side were as follows -
Portuguese (G&G total 351)
3 x Fragatas (Sa Barbara, Sao Jorge*, Sao Martinho) (210)
Q3 C3: Chaser guns, * Flagship (Don Jose is a “middling” commander), Galleon rigged, Master Gunner, Trained gun crews
3 x Carracks (Sa Isabella, Banda Aceh, Hat Yai) (141)
Q4 C5: Drilled soldiers**, High Castles, Reinforced hull, Sluggish, Square rigged
Landing force ** (HoTT total 24 AP)
1 x HrG (Don Miguel Forgaz & entourage)
4 x Bd (sword & buckler men, halberdiers)
4 x Sh (arquebusiers & crossbowmen)
2 x Bd (mercenary samurai)
Ottomans (G&G total 174)
3 x Dhows (Djibouti, Socotra, Zanzibar) (78)
Q3 C2: Lateen rigged, Shallow draft
2 x Galleys (Srivijaya, Songkhla) (96)
Q3 C3: Drilled soldiers, Galleys, Swashbucklers, Yare
Land forces (HoTT total 24AP)
1 x HrG (Dragut Bey & entourage)
4 x Sh (Arab arquebusiers)
4 x Wb (Arab warriors)
2 x Rd (Ottoman Sipahi cavalry)
*************
1. The naval battle of Antsiranana (Dec 1551)
The first battle of Antsiranana was a naval action as the Portuguese attacked. Here’s a high level view of the geography and deployment at the outset. This shows the situation after 3 turns, the time it took the Ottomans to react to the Portuguese arrival.
.jpg)
The brown areas in the harbour are mud flats, navigable without risk only to shallow-draft vessels. The green clumps on top of the mudflats are impassable mangroves. The wind is blowing from the SW (diagonally from lower R). The tabletop is 1800x1200mm.
At the start of turn 4 the defenders are finally ready to activate, while the attackers continue their advance. The defenders activate first.
*************
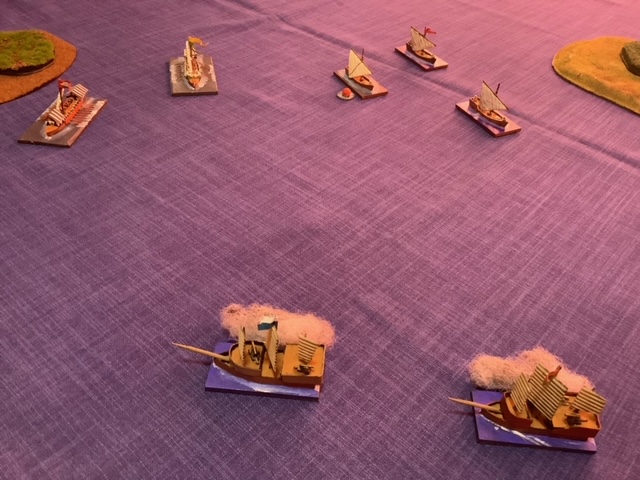
The Ottoman flotilla attacked the infidels without hesitation despite the disparity in strength. The galleys headed towards the front of the Portuguese line, while the dhows moved to intercept the rear. The Portuguese shortened sail, and on turn 5 the two leading fragatas opened fire on the dhows, scoring a single hit on the Zanzibar.


The Portuguese upped their game. The Sao Jorge turned to starboard and delivered a full broadside at the galley Songkhla, resulting in 1 hit + oar damage. Then it fired its chaser guns at the other galley, Srivijaya, dealing it 1 damage too. The second fragata, San Martinho, followed the flagship and fired a full broadside at the dhow Zanzibar, but somehow managed to miss. The last in line, Sa Barbara, didn’t miss, giving the dhow Socotra a hit. Meanwhile the other line, comprising the carracks, altered course 2 points to starboard and sailed on.

Turn 7, and the Socotra turned under the stern of Sa Barbara and delivered a raking full broadside at point-blank range, inflicting 2 damage including a critical hit. Zanzibar then went one better, slipping between the Sa Barbara and Sao Martinho, firing a raking point blank broadside into the former, and an ordinary shot at Sao Martinho. This virtuoso performance resulted in a 3rd damage to Sa Barbara, but missed the Sao Martinho. The galleys unfortunately failed again.
The fragata Sao Jorge, not to be outdone in the virtuosity states, and seeing the Ottoman galleys at ones and twos, sailed between both of them and fired a full broadside & ordinary broadside: the Songkhka received a second hit + a second oar damage (so is now immobile); the Srivijaya escaped unscathed.
Turn 8. The dhows are now in position to attack the carracks in the Portuguese leeward line. These are tougher propositions than the fragatas though, especially defensively, and the dhows’ fire was ineffective against the massive reinforced hulls. Surely the dhows won’t be crazy enough to try to board these monsters? Unsurprisingly the galleys failed activation, yet again.
This time the carrack Sa Isabella led-off the Portuguese response, sailing between the Zanzibar and Djibouti, giving each a point blank broadside (a full broadside raking shot at Djibouti). Djibouti took 1 hit, Zanzibar escaped. Then Hat Yai chipped in with another full broadside at Zanzibar, and this time Zanzibar took 2 hits (to total 3) + critical hit (taking on water). That can’t be good. Banda Aceh tried a long range shot at the crippled leaking Zanzibar, but missed.
Meanwhile the fragatas were also busy, but not very effective. Sao Jorge had a good opportunity to shoot up both galleys but needed to use its activations to change course and shorten sail. Sao Martinho likewise. Sa Barbara had to chance an All at Sea roll and (randomly) sailed straight on, nearly colliding with Sao Martinho.

Turn 9. The galley Srivijaya successfully activated at last, and moved behind the fragatas, out of their line of fire. The dhow Djibouti passed the stern of the carrack Sa Isabella, but could only loose an ordinary broadside shot, which missed. The other dhows also failed to shoot effectively.
The Sa Isabella started the Portuguese bound by sinking the crippled leaking Zanzibar. The other carracks were by now making for the anchorage, and the fragatas were changing course to return and finish off the Ottoman defenders. The Sa Barbara failed an activation while crippled, and turned hard to starboard.

At this point (after 9 turns) the Portuguese have 1 x fragata in crippled condition and both other fragatas have 1 damage each. The carracks are undamaged. The Ottomans have lost 1 x dhow and effectively 1 x galley as the Songkhla cannot move at all. And all their remaining vessels have 1 damage each.
The Ottoman naval commander decides to cut his losses and leave the scene with the 2 dhows & 1 galley he still has. The galley will never make it across the open sea back to Mombasa, but its crew can be taken aboard the dhows. Better to alert the authorities to the Portuguese attack, so it can be promptly countered, than risk annihilation in Antsiranana Bay. Unfortunately Dragut Bey and his troops will have to do the best they can until help arrives.
*************
Some days later … the Portuguese landing force is ashore and a battle against Dragut Bey and his troops is about to start. Dragut has opted not to defend his incomplete fortifications, and will meet Don Miguel in the open where he expects his fanatical infantry (Wb) and sipahis (Rd) will give him the edge.
2. The land battle of Antsiranana (Dec 1551)
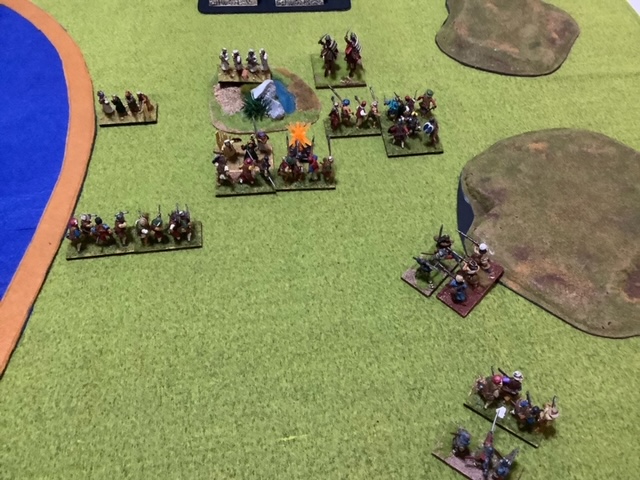
The two armies faced each other on the swampy coastal plain outside the town of Antsiranana, between the Bay and some low coastal hills. The hills and swampy ground comprised bad going.
Dragut advanced his Wb over the hills on the inland flank, while holding back his Sh & Rd. Don Miguel masked the Wb with some of his Sh, continued advancing his main line, and moved his reserve (HrG & samurai Bd) to a position where they could intervene if necessary. However the Portuguese Sh seemed able to keep the Ottoman Wb busy: they destroyed 1 x Wb by shooting, and recoiled another.

The Ottoman Wb apparently hadn’t read the script and charged downhill into the Portuguese Sh. In the centre an Ottoman Rd attacked the inland end Portuguese Bd, and 3 x Sh moved up to within firing range of the Portuguese line.
The shooting caused a Bd recoil, and the Rd was recoiled by the Bd it had attacked. The Wb destroyed one of the Sh they attacked, but also suffered a recoil.


Now it’s turn 4: Ottomans to activate. Dragut moves his Rd and Sh back into position for an attack on the Portuguese centre, while the Wb resists the urge to impetuously continue their charge, and continue fighting the Sh that survived their initial combat - but the second round is a draw. In the centre, Ottoman shooting is ineffective, but Portuguese shooting recoils the Ottoman Rd on the beach.
Don Miguel gets only a couple of PIPs, and uses them to friction attack the Wb, destroying 2 elements. The sole surviving Wb recoils and pursues the Sh. Shooting from both sides continued to be ineffective. Progress score: 2-8 Portugal.

Both sides are getting low PIPs now. Dragut ordered his surviving Wb to break off combat and retreat back onto the BGo hill. And the Ottoman Rd on the beach charged a Portuguese Sh that had no side support because of a prior shooting recoil. The Sh held, and the Rd recoiled.
In their bound the Portuguese declined to chase the Wb onto the hill, preferring to get their Sh reorganised, and Don Miguel moved to support the inland end of the main line. The Sh reorganisation paid off at once, as the Ottonan Rd on the beach was shot down.
Turn 6: Dragut gets good PIPs at long last. He himself hurried up towards the line, but almost the whole Ottoman centre broke contact and pulled back into the swamp. What does he have in mind? Don Miguel has few PIPs so plays it cautious.
Turn 7: Dragut shows his hand: He himself (HrG) leads a charge against the end Portuguese Bd, while the Wb charges one of the samurai Bd. The Bd charged by Dragut and his entourage survives (barely) being destroyed. The Ottonan Sh supporting Dragut’s attack isn’t so lucky, being cooled by another Portuguese Bd. And the samurai Bd fends off the Ottonan Wb.

At the end of the Ottoman bound of turn 7 the Portuguese have won the battle 2-12.
*************
So the Portuguese have gained a foothold in the north of Madagascar by beating the Ottomans by sea and by land.
Many of the survivors of Dragut’s army were captured, and out to work completing the fortifications they themselves had begun, as a Portuguese strongpoint.
Now the Portuguese have to decide how they’re going to work with this new real estate. There are two schools of thought. The navy wants to hold only Antsiranana, as a strongly fortified base similar to Elmira or Malacca. The army wants to march out and take on the natives, with the aim of full-on territorial conquest. It is working in Brazil, so why not here?
*************
Part 2: 1552-1553


The army plan to conquer all of Madagascar - or at least, swathes of the best land - won out. So over the next couple of years the Portuguese found themselves fighting various indigenous tribal groupings. A shortage of Portuguese troops meant that many of the soldiers assigned to Madagascar were mercenaries from other parts of the colonial empire or from neighbouring friendly regions.
We know little about the progress of the conquest, but it appears the Portuguese began by attacking the Sakalava kingdom, along the W coast of Madagascar facing the Mozambique Channel. This region of Madagascar was inhabited by folk of Bantu and Arab origins as well as Malagasy people.
1. The battle of Ankasakasa
The Sakalava capital city of Ankasakasa is about halfway down the W side of Madagascar, though it is not actually on the coast. Some time in late 1552, after conquering the more northerly part of the kingdom, the Portuguese attacked the city to deliver a knockout blow.
The attackers comprised -
1 x HrG - Dom Miguel Forgaz & staff
1 x Kn - Portuguese mounted adventurers
3 x Sh - Portuguese crossbowmen & arquebusiers
2 x Bd - mercenary Samurai
4 x Wb - mercenary SEA tribal warriors
The defenders comprised -
1 x HrG - warlord ruler of Sakalava & bodyguards
6 x Wb - Bantu warriors
2 x Sh - Arab arquebusiers
4 x Hd - armed Malagasy peasants
Here we are after 2 turns, looking N from the Portuguese side towards Ankasakasa city and the Sakalava defenders.

Don Miguel has placed his Kn & Wb on his L, Bd in his C, and Sh on his R. The Sakalava army has the Malagasy peasant Hd on its R, Wb in the C, and Sh on its L.
The rocky terrain is impassable. The fields are Bad going because of deep irrigation channels.
On turn 3 the Sakalava Wb charged the Portuguese, destroying one of the Samurai Bd and recoiling one of the SEA Wb. The Sakalavan Sh also recoiled the Portuguese Sh column with arquebus fire.

In the Portuguese bound the Sakalava Hd lost 2 elements to the Kn & Wb unsurprisingly, but the main Portuguese line failed to stop the Sakalava Wb which kept advancing tho it didn’t destroy any more elements.

Turn 4, and the defenders have few PIPs to continue their offensive. But they’re doing OK without PIPs as the ongoing Wb attack destroys the other Samurai Bd and recoils the Portuguese Wb & Sh desperately defending elsewhere. However the Sakalava Sh fail to destroy the exposed Sh on the Portuguese R, and the other two Malagasy Hd are overrun.

Don Miguel continues to get much better PIPs, but so far it hasn’t done him much good. This time he lines up his victorious L wing elements against the so-far-unstoppable Sakalava Wb. His luck changes dramatically: the L wing shooting goes the Portuguese way and one of the Arab Sh is recoiled, and two Sakalava Wb columns (4 ekements) fall in friction attacks.

A Portuguese victory with a final score of 12-4, but more desperate than the bottom line suggests.
The Portuguese have conquered the Sakalava kingdom, thus seeming to vindicate the army-led strategy of taking over swathes of Madagascar rather than just holding onto Antsiranana as a fortified base (the navy preference).
But it’s not over yet. Alarmed by these events the Merina (or Hova) confederation of highland tribes in central Madagascar decide to attack the Portuguese before they can occupy the whole island. The Hova were the most powerful and feared tribal group on the island, but usually kept to themselves.
*************
2. The battle of Marovoay
The Hova attack seems to have caught the Portuguese off-guard, and several outpost forts guarding the road from Antisiranana to the Sakalava territory fell to surprise attacks. A Portuguese relief army encountered the Hova army at a river crossing near the town of Marovoay, on the Sakalava / Antsiranana border.
The attacking Hova tribes comprised -
1 x HrG - War chief Andriamanelo
1 x Mg - Powerful spirit summoner
8 x Bd - Tribal warriors
The defending Portuguese comprised -
1 x HrG - Don Jose Antonio Mirones & staff
1 x Kn - Portuguese mounted adventurers
3 x Bd - Portuguese swordsmen & halberdiers
3 x Sh - Portuguese crossbowmen & arquebusiers
3 x Wb - mercenary SEA tribal warriors
At the end of 2 turns the Portuguese Bd are defending the bank of the river, and have thrown back the first Hova attack, destroying 1 and recoiling the other.

By the end of turn 6 intense fighting was continuing. On their R the Hova were across the river and had destroyed 2 Portuguese Sh. On their C & L though, another 2 Hova Bd had fallen, to a cross-river friction move by the Portuguese Wb, and an uncompletable recoil. Progress score: 4-6 Portugal.

On turn 7 the Portuguese continued to sweep up the Hova L, destroying another 2 x Bd. The Hova Mg finally tried a bespelling attack, it failed. The score is now 10-4 Portugal. Andriamanelo had better pull a rabbit out of his hat soon, ot it’ll be too late.
He rolled the only ‘6’ PIPs in the game, and threw every surviving element into combat. A Hova Bd attacked the last surviving Portuguese Sh, and destroyed it (uncompletable recoil), so a good start. The other combats were indecisive. Lastly, Andriamanelo personally charged Don Jose, with a Hova Bd overlap, but Don Jose prevailed and the Hova commander fell.
So that ticks the score over to 6-14 Portugal. The Hova army survivors must retire into the highlands and plan their next move.
*************
3. The battle of Antananarivo
After this victory the Portuguese land command at Antsiranana grew overconfident, as they began to believe that Madagascan forces were no match for Portuguese. In late 1553, after more reinforcements had arrived, Don Jose led a large army* into the middle of Hova territory to attack the capital city of Antananarivo. A high-risk high-reward strategy. The Portuguese encountered little opposition at first, as the Hova fell back while concentrating their forces.
Then, as the Portuguese came in sight of the city, the whole Hova army was waiting for them.
* 36AP, created by stripping all garrisons, including Antisiranano, to the bone.
The Portuguese attackers comprised -
1 x HrG - Don Jose Antonio Mirones & staff
1 x Pd - Inspirational militant priest
5 x Bd - Portuguese swordsmen & halberdiers
4 x Sh - Portuguese crossbowmen & arquebusiers
1 x Kn - Portuguese mounted adventurers
1 x Art - Field artillery
1 x Lu - Scouts
2 x Bd - mercenary Samurai
The Hova defenders comprised -
1 x HrG - King Ralambo, commanding in person
1 x Mg - Powerful spirit summoner
1 x Bh - Mythical Madagascan monster
2 x Sh - Maiden guards
10 x Bd - Hova warriors
After 3 turns the two armies are cautiously approaching each other. The only action has been when the Portuguese Lu was brushed aside by a Hova Sh. It’s looking like it’ll be a slogging match in the C, tho the Hova may be going to try a left hook with the Mythical Monster Bh.
Then, in their bound of turn 4, the Hova struck, attacking on their L and in the C, bringing down a Portuguese Sh on the hill and destroying the Art.

Don Jose, apparently caught by surprise by this bold move, could manage only 1 PIP. He used it to friction counter-attack the Bh, but this failed.
Turn 5, Ralambo gets another high PIP roll, and the Hova go on the rampage. The Bh recoils a Samurai Bd. The warriors destroy a Portuguese Bd and Sh.
This time Don Jose does better with PIPs, but can’t seem to win many combats. No Hova are destroyed, but at least no more Portuguese fall either.
Turn 6. The Hova continue their attacks on the Portuguese wings. On one hill the Bh destroys a Samurai Bd. On the other hill the Hova Bd recoil a Sh. The Portuguese can’t win a combat, and are now very much on the defensive, with a progress score of 12-0 Hova.

Turn 7. Following a “meh” Hova bound, Don Jose rolls really well and finally picks up some scores. He intervenes in the Bh fight and the beast is finally killed. The Portuguese Kn, with Bd assist, destroys a Hova Bd (nb in HoTT Kn do not QK Bd).
Skipping ahead to the Hova bound of turn 9 as the battle turned into a dour slog, though with the Portuguese defending an increasingly difficult position, and the Hova getting much better PIP dice.
The breakthrough for the Hova finally came when the Portuguese Pd fell in combat with a Hova Bd, taking the final score to 18-6 Hova.

It’s a decisive Hova victory. The Portuguese have lost their Pd, Art, Lu, 3/4 Sh, 1/5 Portuguese Bd, 1/2 Samurai Bd. The Hova have lost 1 x Bd, 1 x Bh.
And the Portuguese survivors are deep in enemy territory, many leagues from the nearest friends, and an enemy army in an excellent position to launch a sustained pursuit. Few if any Portuguese survivors will make it back.
After this fiasco the Portuguese completely gave up the idea of conquering Madagascan territory, and withdrew to Antsiranana, holding the by-now well fortified base and immediate hinterland.
More to come, as the Ottomans launch a naval attack to try and recapture Antsiranana.
*************
Part 3: 1554
In the Ottoman bound, the small “Portuguese” wako junk Bean Sprout came back to capture the “Ottoman” warship Lucky Breeze. But the victorious Hakka Merchant disengaged from the Bamboo Shoot and moved into contact with Bean Sprout, though it couldn’t grapple this time.

The Ottomans weren’t done yet, as the war junks Conch Shell & Green Eyebrows started to change course to intercept the San Martinho, and the monster transport Hat Yai (Bottom C) finally began to move, turning to point directly at the fragata.


The Portuguese holding Antsiranana got the Christmas present they had been expecting, when in late 1554 news of an impending Ottoman naval attack was confirmed. No reinforcements could be spared for the fortress garrison and it was clear to the Governor, Don Jose Antonio Mirones, that he would have to hold out as best he could.
Mirones, it will be recalled, was planner and commander of the Antananarivo expedition that was virtually wiped out by the Hova tribal confederation in mid 1553. Although no-one is saying so out loud, he’s been given the job of Governor as a punishment.
Also the naval force available to defeat the attackers at sea was much smaller than spies reported the Ottoman fleet to be.
The battle of Mayotte, December 1554
Sebastien Vernier, our main / only source of information about events so far, must have left Madagascar soon after the battle of Antananarivo (where says he was slightly wounded) as he was back in Venice by the feast of St Mark 1554. We know that the naval engagement was in December, in the Mozambique Channel off the island of Mayotte, that the Ottoman force was much larger, that both sides used some Asian ships, and what the outcome was, from Ottoman archives. But everything else, including the composition of the squadrons and names of the commanders, is conjecture. Bearing that in mind, here is my recreation of events.
*************
The Portuguese squadron, hearing from their scouts that the Ottomans had stopped at Mayotte to replenish water supplies, decided to attack while the enemy was at a disadvantage. The Portuguese commander probably had the following vessels, totalling 230 points -
1 x Fragata (San Martinho) [60]
Q3 C3: Chaser guns, Galleon rigged, Master gunner, Trained gun crews
2 x small Wako junks (Bamboo Shoot, Bean Sprout) [50 each]
Q2 C2: Derring-do, Intimidating, Lateen rigged, Reinforced hull, Yare
1 x Airship (Dragao) [70]
Q3 C2: Airship, Bombs, Fiery attack, Lateen rigged, Master gunner
The Ottoman squadron, which was in Domoni Bay when the battle started, most likely comprised these vessels, totalling 416 points -
3 x Dhows (Djibouti, Socotra, Zanazibar) [16 each]
Q3 C2: Lateen rigged, merchantman, Shallow draft
4 x large War junks (Conch Shell, Green Eyebrows, Hakka Merchant, Lucky Breeze) [42 each]
Q3 C3: Drilled soldiers, Lateen rigged, Reinforced hull
4 x very large troop transports (Lotus Blossom, Peony Pavilion, Banda Aceh, Hat Yai) [50 each]
Q4 C5: Drilled soldiers, Bow guns, Reinforced hull OR High castles, Sluggish, Square rigged, Sweeps, Veteran NCOs
*************
The Portuguese attack, coming in from the W, found the whole Ottoman squadron at anchor in Domoni Bay. By the end of turn 3 the Sao Jorge and Dragao seemed to be heading directly for the troop transports, while the Bamboo Shoot and Bean Sprout moved to take on the two Ottoman war junks emerging from the NW exit from the Bay.
The wind is blowing from the N. The view is Easterly, from above the Ottoman anchorage. By the end of turn 3 most Ottoman vessels have raised or slipped their anchors and are responding to the attack. The war junks Hakka Merchant and Lucky Breeze, and two of the dhows, are under full sail and heading for a fight against the small Portuguese junks. At the S end of the Ottoman anchorage the other war junks were slower to react. And the four large transports have yet to react at all.
After 6 turns the Portuguese are in trouble. The small junk Bamboo Shoot has been captured in a boarding fight by the warship Hakka Merchant, and the other small junk Bean Sprout is in trouble in its own boarding fight against the Lucky Breeze. Red markers = damage, Green = grappled, Yellow = struck or captured. The Bamboo Shoot put up a valiant fight, crippling the Hakka Merchant (3 damage) before succumbing.
The San Martinho (with Dragao nearby) has been shooting at the nearest dhow, Zanzibar, and scored two hits. San Martinho was lucky to avoid fire from the huge transport Lotus Blossom which instead rolled turnover. The other transports still have not weighed anchor.
On turn 7 the San Martinho and Dragao both attacked the Lotus Blossom, but the Fragata’s broadside, and the Airship’s fiery attack, failed against the reinforced hull (and bronze-sheathed roof) of the monster. San Martinho scored a consolation 1 hit + rigging damage against the dhow Socotra though. Blue markers = critical hit effects.


On turn 8 the Bean Sprout, manoeuvring to contact the Hakka Merchant, had to do an All at Sea roll, and “mistakenly” fired into it, causing excess damage and sinking the larger Ottoman vessel. I ruled that in the circumstances the Bean Sprout could continue its turn (Yare) to contact (but not grapple) the Bamboo Shoot, with the aim of recapturing it from the prize crew. Elsewhere, the San Martinho and Dragao again attacked the monster transport Lotus Blossom, pouring in fire from point blank range. A raking full broadside into the stern, and bombing attack resulted in 2 hits (damage) to the Lotus Blossom.

Luckily for the Portuguese, the Ottomans couldn’t accomplish much because of an early turnover, but Peony Pavilion, another monster transport, is now ready to join the action. And it’s pointing straight at San Martinho.
On turn 9 the Bean Sprout chased down, caught, and grappled (but no AP to board) the fleeing Bamboo Shoot, whose prize crew were trying to take their captured junk out of the action. The Lucky Breeze, with a “Portuguese” wako prize crew on board, contacted, grappled, and boarded the dhow Djiboutu, which had thought it was the hunter not the prey. I ruled the prize crew would use their derring-do and Intimidating factors, but be -1 for small numbers. They won the first boarding round so Djibouti has 1 damage.

In the main part of the battle the San Martinho and Dragao could do only their compulsory sailing movement because of an early turnover. Leaving the fragata in a precarious position … Ottomans to activate next.

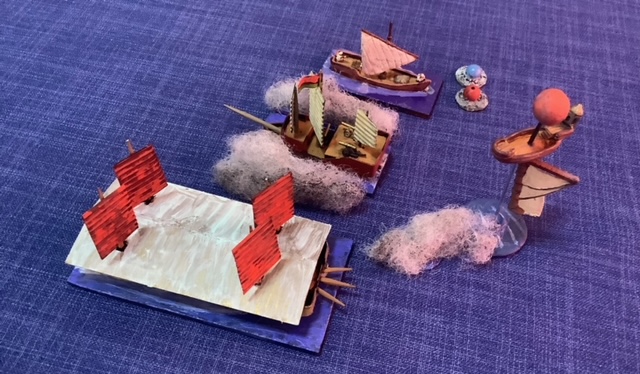
The Ottomans started badly, as their prize crew on Bamboo Shoot failed to cut the grapples thrown by the pursuing Bean Sprout. Then the dhow Djibouti rolled turnover as it tried to repel boarders from the captured Lucky Breeze. So all their other operational vessels were restricted to compulsory movement only. Unfortunately this meant to a three way collision between the Lotus Blossom, and the dhows Zanzibar and Socotra. The Zanzibar, and the Lotus Blossom, each both already carrying 2 damage, both took 2 extra damage and so they both sank!!! Socotra was unhurt.

But it’s not over yet. Peony Pavilion collided with San Martinho, and the two war junks Green Eyebrows and Conch Shell collided with each other. The crew of Dragao, high above this imbroglio, are watching open-mouthed. San Martinho and Peony Pavilion both emerged unscathed (it’s only a glancing blow) and both will be able to move on. The war junks took 1 damage each.

Turn 10. The Ottomans have lost 1/4 of their monster armoured troop transports, and with it 25% of the landing force for besieging Antsiranana. They are also down 2/4 of their war junks and 1/3 of the dhows, and the remaining war junks and dhows are all damaged. Admittedly much of the loss has been caused by navigation errors rather than enemy action. But that hardly makes it taste better.
Can the Portuguese go on to win a victory worthy of the glory days of Almeida and Albuquerque?
The Bean Sprout quickly recaptured the small wako junk Bamboo Shoot, then recovered the grapples, as both vessels got ready to re-enter the battle (though they’ll need to be careful, as both are crippled - carrying 3 damage points). The prize crew on Lucky Breeze took the dhow Djibouti to 3 damage, without taking any losses itself. In the main part of the fight, Dragao couldn’t shoot as it needed to manoeuvre into a better position, but San Martinho fired a close range full broadside into Green Eyebrows as they passed each other, causing a 2nd damage and a Taking on Water critical hit.
The Ottoman response again began disappointingly, as the junk Djibouti fell to the prize crew from Lucky Breeze. But amongst all the manoeuvring: the last troop transport, Banda Aceh, is finally ready for action and the war junk Green Eyebrows turned behind San Martinho and delivered a short range raking broadside. Which somehow totally missed.

*************
Now the Portuguese commander decided to break off the action while he can. He has only the fragata and airboat, both so far undamaged. These will no doubt be able to get back to Antsiranana. The two small wako junks, and their two prizes, can most likely also get away. There is little threat of bad weather (these ships are all crippled) and they might well be repairable back in port as most damage is only boarding damage, not structural. And there is little threat of immediate pursuit from the Ottomans.
Here’s a final end-of-game view. Yellow dice mark the Portuguese vessels, including the 2 prizes at upper R. At L the dice mark San Martinho & Dragao.

The remaining Ottoman escorts amount to 2 damaged war junks and 1 damaged dhow, so the Ottoman commander will also need to consider whether he should press on, or retreat to East Africa. My contingent rolls indicated he initially pressed on, but then lost another transport wrecked on the Madagascan coast, and then called off the expedition.
In real life the Portuguese ended up abandoning Antsiranana within a few months, presumably deciding it was not worth trying to hold.
Cheers from Pattaya
Mark
Also best wishes for Christmas and the New Year ;)
I didn’t know anybody else did Wargaming set in Madagascar! I have an army of Malagasy warriors. Are you anywhere near Arkansas?
ReplyDeleteThanks! I'm afraid I'm in Ireland, and Mark, who played those games, is in Thailand.
Deletehttps://www.reddit.com/r/wargaming/comments/1pfsvod/malagasy_warband/
DeleteHere’s some of my miniatures if you are interested.
Awesome!
Delete